Monday, July 9, 2012

Chocolate Chip Cookie Cups with Reese's


I am not a big fan of candy, with the exception of good chocolate, Reese's Peanut Butter Cups, Twix, black licorice and hot tamales.  For times when I am in the mood, I keep a secret stash!  So far the boys have not found this secret stash, even though it is in the kitchen and not all that hard to find.  Shhhh....don't tell them but I hide all my good candy behind my baking supplies!  Going into the baking supplies would mean they were going to do work, so I figure that's a safe place to hide things! Oh shoot! Now all of you know where to find my good candy, I'm going to have to come up with a new hiding spot!

My collection of candy has grown faster than I care to eat it all so I decided to reduce it by contributing my bag of mini Reese's Peanut Butter Cups to a blog post!  Really I am killing two birds with one stone because I have been dying to try the Mini Muffin Pan from Demarle at Home.  My friend Kim is a representative (here) and she loaned a few pieces for me to try out and give my opinion!  So happy to try out any baking or cooking equipment, always looking for a good excuse to bake!!  

I see people making cookie cups with peanut butter cookie dough and a mini Reese's PB cup in their mini muffin tins all the time.  I felt that might be peanut butter overload so I made my personal Chocolate Chip Cookie recipe but substituted mini chocolate chips for the regular sized ones.  I used my smallest cookie scoop to fill the muffin pan and baked until almost done, then I set a Mini Reese's on top and baked for 3 more minutes.  I absolutely loved the mini muffin pan!  Super easy to use, no spray or oil necessary and my cookies popped right out without any sticking or mess.  Can't wait to try the regular muffin pan and make some CUPCAKES!!!  


The cookies were YUMMY!!  They were also gone before I had a chance to hide any in my secret stash for later!  ;)  Oh well, I did what I set out to do....all of the Reese's are gone and I have a new favorite baking pan!!


Before I forget....I set up a Facebook fan page!  Please stop by and "Like" me (here).

Enjoy!

Chocolate Chip Cookie Cups with Reese's

2 sticks butter
1 cup brown sugar
½ cup sugar
1 t salt
2 t vanilla
2 large eggs
1 t baking soda
2 ½ cups flour
1 cup mini chocolate chips
1 bag mini Reese's Peanut Butter Cups

Preheat the oven to 350 degrees F.

In a mixer, cream butter with the two sugars until fluffy and light.  Add the vanilla and eggs and beat until fully blended.

In a large bowl, whisk together the flour, baking soda and salt.  Add to the creamed butter mixture just until mixed.  Mix in the chocolate chips.

Use a small scoop to fill the cups of a mini muffin pan.  Bake for 8 minutes, pull pan out of oven and place a mini Reese's Peanut Butter Cup in each cookie.  Pop back in the oven for 3 minutes.  Cool on rack for 10 minutes before removing from pan.

Store at room temperature.

Recipe Shared On:
Foodie Friends Friday

Thursday, July 5, 2012

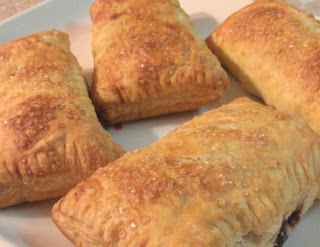
Cherry Hand Pies


4th of July!  When I think of 4th of July, I think of parades and BBQs and fireworks!  Growing up it was always a special holiday, as I have a very patriotic family and there is no more patriotic holiday than the 4th of July.  I remember going to parades and every time an American flag would pass by, Mom would make me stand.  Up, down, up, down for the entire parade.  It probably would have been easier if I'd just stayed standing! Mom and I joke about it now but I have to tell you, whenever I am at a parade and the flag passes, I find myself standing, hand on heart! :)

The boys were with their Dad for fireworks this year so I wasn't planning on doing anything to celebrate but at the last minute I had a few friends over for an impromptu dinner.  It was not your typical 4th of July meal but it was soooooo delish!!!  My friend Jen made a yummy baked cod dish and nectarine salad that was to die for!  I made summer corn cakes with avocado salsa, which I promise to blog about another day, they were so yummy!

Of course, I was in charge of dessert.....what to make???  I planned on doing something with apples until my niece, Samantha, posted on Baker Becky's Facebook fan page (here) that she would like me to make a cherry dessert for the blog.  I LOVE homemade cherry pie but I know that Samantha doesn't have a rolling pin (and I'm opposed to store bought pie crust) so I decided to make Cherry Hand Pies, which use puff pastry!  I saw the recipe in Bon Appetit last year and meant to make them but completely forgot.  Couldn't find the magazine anywhere so thank God for Epicurious.com!!!  The recipe (here) is simple and the ingredients easy to find at any grocery store.


The other reason I wanted to make these hand pies rather than a traditional pie is that I wanted to use my new silpats!!!  My good friend Kim (here) is a representative for Demarle At Home and I just got my new Silpats from her.  My old Silpats lasted at least 15 years (which is a long time for someone who uses them almost daily) and I have been flying through the rolls of parchment paper.  So happy to have the new mats so that I am not  using so much paper! No sticking and easy cleanup from the cherry juice that drizzled out of my hand pies!! 


I love this recipe because it uses puff pastry which is easy for anyone to use, even those who are not experienced bakers.  I used Pepperidge Farms because that's what I have available to me but feel free to use any brand.   I defrosted each sheet in the refrigerator and then rolled them to make them a little longer, but this is not necessary if you don't have a rolling pin.  The only real work to this recipe is pitting the cherries.  I'll admit it is a bit of a pain-in-the-you-know-what, but it's not impossible!  Cut your cherry in half and pull out the pit, ta da!!  If you have a cherry pitter it is even simpler!!


Totally worth any extra work from pitting the cherries because these are delicious!  Those of you who don't like cherry pie have probably had pie filling from a can.  Trust me, fresh cherry pie is unbeatable!!  Perfect for 4th of July or any summer BBQ!!  

Cherry Hand Pies

1 1/2 tablespoons cornstarch
2 cups fresh cherries, stemmed and pitted, or about 12 ounces frozen pitted cherries, unthawed
2/3 cup dried cherries
1/2 cup sugar
1 teaspoon vanilla extract
1/8 teaspoon kosher salt
1 14-ounce package all-butter puff pastry,  thawed in refrigerator
Flour (for dusting)
1 large egg white
1 1/2 teaspoon course sugar

Line a large rimmed baking sheet with a silpat mat (can use parchment paper). Stir cornstarch and 1 1/2 tablespoons cold water in a small bowl to blend. Combine fresh cherries and next 4 ingredients in a large saucepan. Cook over medium heat, stirring occasionally, until cherry juices are released, about 5 minutes. Add cornstarch mixture; bring to a boil, stirring often. Remove from heat and let cool to room temperature, stirring occasionally.

Roll out pastry on a lightly floured surface to an 10 x12" rectangle (if you don't have rolling pin, skip this step). Using a sharp knife or pizza cutter, cut each dough into 4 6x5" rectangles (cut into 4 equal squares). Whisk egg white and 1 tablespoon water in another small bowl for egg wash.

Working with 1 pastry rectangle at a time, place on a work surface and brush edges with egg wash. Scoop 3 tablespoons cherry mixture onto one side; fold dough over filling so that short ends meet, forming a 5x3" packet. Crimp edges with a fork to seal. Using a sharp knife, cut a few slits in top of pie to vent. Place on prepared baking sheet; repeat with remaining dough and filling.

Brush tops with egg wash, then sprinkle with raw sugar. Chill for 30 minutes. Preheat oven to 375°F. Bake pastries until tops and bottoms are golden brown, 30-40 minutes. Let cool for 10 minutes on baking sheet. Transfer to wire racks; let cool completely. DO AHEAD: Can be made 1 day ahead. Let stand at room temperature.

Makes 8 hand pies.

Adapted from Epicurious.com

Recipe shared on:
Foodie Friends Friday

Sunday, July 1, 2012

More Donuts!


Yep...donut time again!  

This weekend was my son's 13th Birthday Party.  Every year I get excited wondering what my kids will want for dessert on their birthdays.  I start thinking about unique cakes I can make, or even cupcakes.  I can pull the fondant out or get out my piping bags and tips and make some cool characters.  But alas, it is never to be so.  My youngest does NOT like cake.  I have to beg him to try the cupcakes I make for my blog.  No, he is not a lover of cake and so, he requested donuts for his dessert! 

I guess they were on his mind since we just made them two weeks ago for the blog,  "Baked Donuts with Chocolate Glaze".  He requested vanilla donuts with chocolate glaze, vanilla donuts rolled in cinnamon sugar, and, chocolate donuts with vanilla glaze and toffee bits!

I'm all for making life easy, so I used the same recipe base for all three donuts.  


I got up at 6am on a Saturday morning for that silly boy, the things we do for our kids!  My vanilla with chocolate glaze turned our perfect, probably even better than the first time.  We added sprinkles to make them look more like "Birthday" donuts!


To make the cinnamon sugar donuts, I used the same vanilla donut recipe.  When the donuts are done baking and are still warm, I dipped them in melted butter and then tossed them into a cinnamon sugar mixture.  So easy, you don't even need a recipe!  Just melt a half a stick of butter for a batch of donuts and mix 1/2 cup of sugar with 1 teaspoon of cinnamon for the topping.  Then place on your rack to cool!


The chocolate donuts were also the same recipe but with 1/4 cup of cocoa mixed into the dry flour mixture.  I then glazed the donuts with vanilla glaze made from 1 cup of powdered sugar, 3 tablespoons of milk and 1 teaspoon of vanilla.  You can sprinkle anything you like on top, I chose toffee bits (because I'm an addict)!


All of the donuts were yummy!  The favorite for everyone was the cinnamon sugar donut.  I mean....the kids were fighting over them!  Next time, I make an extra batch of these!!!  The butter kept the donuts super moist and the cinnamon sugar made them taste FABULOUS!!  The chocolate donut was yummy but denser and less moist.  Next time I will try taking out some of the flour and adding more buttermilk.  


The house smelled and looked like a bakery!  There was flour everywhere but the end result was beautiful donuts and a VERY happy Birthday Boy!


For my baked donut recipe, click HERE


Tuesday, June 26, 2012

Strawberry Shortcake


To me summer means warm days, swimming pools, BBQs, 4th of July fireworks, and lots of wonderful, sweet fruit!  Especially STRAWBERRIES!!  With 4th of July coming upon us soon I have been looking through my recipes for some great ideas and I thought, what could be better than yummy Strawberry Shortcake!  This was one of my favorite desserts growing up!  My Mom made it every summer and I can still remember those sweet juicy strawberries!  


Strawberry Shortcake is a very straightforward and simple dessert but there are always ways to modify it to your liking.  You can make a sweet cream scone, a biscuit, angel food cake or even pound cake for your base.  I chose to make a sweet cream scone, I like that it is solid enough to hold up to all of the berry juice without falling apart.  I love the recipe from Joy of Baking (here) and followed their instructions almost exactly, with a couple of minor changes. In my instructions below I said to cut into rounds but if you are like me and you hate to waste any of the dough, feel free to form the dough into a big square and cut the scones into squares as well. That way there is no waste!  :)


I used strawberries that were pretty juicy and sweet on their own and I just crushed about 1/3 of them with my potato masher before adding them to the rest of the sliced strawberries and sugar.  If you let this sit out for a while, it will become syrupy and juicy and super yummy.  Feel free to add any other berries that you like as well.  I love to do a mix of raspberries and blueberries with the strawberries!


If you are super busy, like me, and you like to whip the cream ahead of time, use the tip that I got from Joy of Baking....  pour cream, sugar and vanilla into your mixing bowl together and place in refrigerator for 15-30 minutes before whipping.  If you do this, your whipped cream will hold for a few hours in the refrigerator without deflating and becoming runny.  I'm not sure why it works, but it does!  Every time!!  


I hope you all have a great summer filled with lots of BBQs, picnics, swim parties and LOTS of great food!!


This recipe featured on:

Strawberry Shortcake

Cream Scone:
2 cups all-purpose flour
1/4 cup granulated white sugar
2 teaspoons baking powder
1/4 teaspoon salt
1/3 cup cold unsalted butter
1 large egg
1 teaspoon pure vanilla extract
1/2 cup cream, half and half, or milk
Preheat oven to 375 degrees F (190 degrees C) and place rack in middle of oven.  Line a cookie sheet with parchment paper. 

In a large bowl, whisk together the flour, sugar, baking powder, and salt. Cut the butter into small pieces and blend into the flour mixture with a pastry blender or two knives. The mixture should look like coarse crumbs.  Whisk together the egg, cream and vanilla extract and add to the flour mixture, mixing just until the dough comes together. Do not over mix the dough.

Transfer to a lightly floured surface and knead dough gently four or five times and then pat or roll the dough into a 7 inch (18 cm) round. With a 3 inch (7 cm) round cookie cutter, cut out rounds and place the scones on the baking sheet. Brush the tops of the scones with a little cream and sprinkle the top with course sugar. Bake for about 15 - 20 minutes or until nicely browned and a toothpick inserted in the center of a scone comes out clean. Transfer to a wire rack.

Filling:
2 pounds fresh strawberries (cleaned and sliced)
1/4 cup - 1/3 cup granulated white sugar (or to taste)
Place strawberries in a bowl and sprinkle with the sugar. (The amount of sugar used will depend on how sweet the berries are.)  I like to mash about 1/3 of the strawberries a bit and mix them in with the rest of the sliced strawberries. Set aside to macerate at room temperature for about 30 to 60 minutes.


Whipped Cream:

1 cup cold heavy whipping cream 
1 tablespoons granulated white sugar 
1 teaspoon vanilla extract
Chill the mixing bowl in the freezer for 15 minutes before whipping the cream.   Place the cream, sugar and vanilla in the bowl and whip until stiff peaks form. The whipped cream can be covered and stored in the refrigerator for a few hours.

Assemble:
Cut the scones in half and place the bottom half of the scone (soft side up) on a dessert plate. Top with some of the strawberries and whipped cream. Place the top half of the scone on the strawberries. Top with whipped cream and a few more strawberries. If there is any juice from the strawberries, drizzle a little over the top of the scone. Serve immediately.


ENJOY!!!


Thursday, June 21, 2012

Rainbow Cupcakes

UPDATE: Ok, I have made these several times now and I can honestly say....FOOLPROOF!!  The only changes I have made is to the brightness of the colors based on the request of the client.  I LOVE this recipe and so does everyone who tries them.  I made them for my Birthday Party the other day and had pictures taken of the most recent batch.  The pictures turned out great and I had to share my favorite:


First of all.....I cannot even begin to tell you how much fun this was!!!  I was able to talk two teenage boys into mixing, coloring, stirring, layering, and baking these bad boys.  And....they did it willingly!!  They probably even enjoyed it!


Today we planned to visit my brother and sister-in-law and their family (including my grand-nieces and nephew).  When going to someone's house to visit, you should always take a treat.  You don't want to show up empty handed.  I thought my two adorable nieces would really LOVE these cupcakes with all of their bright colors and the gooey, yummy seven minute frosting!  Besides, it is the prerogative of the Aunt (or Grandmother) to feed copious amounts of sugar to all young family members who don't live with them!  It is tons of fun to feed someone else's kids sugar and then leave once you have them bouncing off the walls!  :)


I do not have a recipe for you today, more of a technique for Rainbow Cupcakes:

Step 1 - Take your favorite white cake recipe (mine is Martha Stewarts) or your favorite white cake mix.

Step 2 - Separate your batter into 5 bowls (more or less, depending upon how many colors you would like to use).


Step 3 - Add food coloring to each of the bowls (I use gel colors and make them super bright)


Step 4 - Spoon a layer of your first color into the bottoms of the cupcake liners, you can spread the layers out with a spoon if you prefer or do as I have and leave the spoonful where it lands.  I like the fun look of the colors swirling around.

Step 5 - Repeat layering with each of the colors and then bake as recipe directs.


Step 6 - Allow cupcakes to cool and then frost as desired.  I used my famous Seven Minute Frosting recipe which tastes just like homemade marshmallow frosting !


This post featured on:


Seven Minute Frosting

1 ½ cups sugar
¼ teaspoon cream of tartar
1/8 teaspoon salt
1/3 cup water
2 egg whites
1 ½ teaspoons vanilla extract

Place all ingredients, except vanilla, in top of a double boiler.  Place pan over boiling water, being sure that boiling water does not touch the bottom of the top pan.  Beat constantly on high speed with electric mixer for 7 minutes.  Remove from heat and beat in vanilla.

Enjoy!!!

Tuesday, June 19, 2012

Baked Donuts with Chocolate Glaze


Summer break is here, school is out, teenagers are running wildly through my house, shooting dart guns, hiding each other's things and holding them ransom, making messes and eating every scrap of food in sight!  There are always stray kids spending the night and they all stay up super late, watching inappropriate TV and making tons of noise!  Basically, I haven't laughed this much in years and I am sleep deprived!

When you have sleepovers at your house there are certain expectations....pizza for dinner, soda, dessert and donuts for breakfast!  Since I am not made of money and I cannot seem to get my money tree to grow in the garden, I am forced to improvise!  Last night was homemade pizza (see my post from January called "Sleepovers and Homemade Pizza") which is much healthier, super easy, and INEXPENSIVE!!!  For breakfast I decided it was time to pull out the Wilton donut pans and try baked donuts!  

I got the pans as a gift a while back and there they sat....in the box....in the garage.  I thought the idea of baking homemade donuts was nuts.  Too much work, too much time and there was no way they would be good.  WRONG!!!  

I can't believe how easy they were to make!  Took 10 minutes to put the batter together and 8 minutes to bake them and dip them in a chocolate glaze.  It actually took the kids longer to eat them all than it took me to make them!

Everywhere I look lately I see people blogging about their baked cake donuts.  I figured it was about time I see what the fuss is all about.  I searched around and found that most people were using an adapted version of the recipe Wilton includes with the donut pans.  I particularly liked the sound of the recipe on Cook Au Vin, as she stated that her recipe was lighter and fluffier and less dense than most other recipes.  


I followed her recipe pretty much exact except that I doubled it and excluded the cocoa, making mine a vanilla donut (as was requested by the boys).  I did not use her glaze but chose a recipe that Alton Brown used on his show when he made donuts.  The glaze reminds me of the chocolate glaze on the raised donuts at a shop here in town!  YUMM!


I hope you all try them!  Don't be afraid!  Just get your donut pans out of the garage (or head to the store to buy some) and start baking!  Next time I'm making Chocolate with Chocolate glaze and toffee bits!!!


Baked Donuts with Chocolate Glaze Adapted from Cook Au Vin

2 cups cake flour (can use all-purpose if need)
1 teaspoon baking powder
1/2 teaspoon salt
3/4 cup granulated sugar
2 large eggs, lightly beaten
3/4 cup buttermilk
4 tablespoons unsalted butter, melted and cooled
1 1/2 teaspoons distilled white vinegar
1 teaspoon baking soda
2 teaspoon vanilla extract

Preaheat oven to 375 degrees.   Spray donut pan with cooking spray.

Into a medium bowl, sift the flour, sugar, baking powder and salt.  Add the buttermilk and egg and combine.   Stir in the butter.   In a small bowl, combine the baking soda and vinegar, then add vanilla.  Add this mixture to the donut batter and combine.

Put the batter into a ziplock bag and snip a hole on the end.  Squeeze the dough into the donut pans, only filling each about half way.  They will rise considerably while baking and the hole will close up if you fill them too much.   Bake for 8 minutes.  Allow to cool for a few minutes before moving them to a cooling rack.   Wipe the pan out, spray with cooking spray again, and bake the remainder of the dough.


Chocolate Glaze Adapted from Alton Brown at Foodnetwork
2 cups confectioners’ sugar, sifted
1/2 cup unsalted butter
1/4 cup whole milk, warmed
1 tablespoon light corn syrup
2 teaspoons pure vanilla extract
4 ounces bittersweet chocolate, chopped

Combine butter, milk, corn syrup, and vanilla in a medium saucepan and heat over medium heat until butter is melted.  Decrease the heat to low, add the chocolate, and whisk until melted.  Turn off heat, add the confectioners’ sugar, and whisk until smooth.

Dip the cooled donuts into the glaze and place back on the rack to set.

ENJOY!!

Wednesday, June 6, 2012

Peanut Butter Cup Rice Krispies Treats


Who didn't LOVE Rice Krispies Treats growing up?  I sure did!  So much so that as a teenager I would make them all the time and even experiment with different cereals and marshmallows.  My favorite experiment was Lucky Charms Treats....a bit over-the-top sweet but really YUMMY!!  As a grown up I started making good old fashioned Rice Krispies Treats for my boys.  Luckily they love them as much as I do and they are ok being taste testers for my silly experiments and creations!

Yesterday was an exciting day in my household.  We were going to watch Venus travel on it's path in front of the sun.  This is the only time in our lifetime we will witness this and the boys and I were excited to watch!  Our neighbors have this really cool welder's lens that allows you to look directly at the sun and see Venus make its journey, without harming your eyes (minor details  LOL ).  They shared it with us during the recent Solar Eclipse and we were excited to have the opportunity to use it again so soon!  

So, the boys invited a couple of people over and I invited a couple of people over to view with us and the next thing I know, I've got 12 people coming to view Venus and I can't have people over without feeding them!  I made a big pot of sauce for dinner and I wanted to do something fun for dessert.  Hmmmm....what could be more fun than a Rice Krispies Treat?  Jenny, at The Picky Palate had a recipe for treats using Reese's....need I say more?


These yummy treats are too good to pass up, even for grown-ups!


My tip for you all when making any treats using marshmallows....spray everything with non-stick spray!  I spray all of the bowls and my spatula or wooden spoon before I even start.  This way all of your rice krispies go into the bars and don't stick to the bowls!!  :)


Start with a layer of your basic Rice Krispies Treat (you could mix it up a bit and use Cocoa Krispies).....


Then melt peanut butter, mix in some chopped peanut butter cups, and spread on top.  Spread a layer of melted chocolate over the top of that and wait for it to set....or don't, some people have no self control!  Pretty sure these were a hit (people started eating them all before dinner was even ready)!!


Peanut Butter Cup Rice Krispies Treats

6 Cups rice krispie cereal
1 large bag mini marshmallows
1/4 Cup butter
1 teaspoon vanilla
2 Cups creamy peanut butter
50 mini Reeses Peanut Butter Cups, quartered
1 1/2 Cups melted chocolate to drizzle

Place cereal into a large mixing bowl, set aside.  Place marshmallows and butter into a large bowl and microwave until puffed up, about 3 minutes.  Add vanilla and stir.  Pour over the cereal, mix to combine then pour into a greased 9×13 inch baking dish and press to make even.  Melt peanut butter until nice and runny, about 45 seconds.  Pour in quartered peanut butter cups, stir gently then pour over treats.   Drizzle melted chocolate over top and smooth top with an offset spatula.  Refrigerate to set.

Enjoy!

Adapted from The Picky Palate

Recipe Shared On: