Thursday, September 27, 2012

Orange Chicken


This, my friends, is what I like to call a "main dish"!  I know, I know, I know....you are not used to such things from Baker Becky, with the rare exception of baked main dishes you primarily see my baked desserts.  The blogging world knows me as a baker but believe it or not I make part of my living as a caterer and I really LOVE to cook!  I posted this picture on Baker Becky's Facebook page and had some requests for the recipe so I decided share with you all.  

I do the meal planning in my household but I like my boys to be part of that so I try to let each of them plan the menu for one night per week.  This week, my youngest chose his favorite "going out" meal....Orange Chicken.  I will confess that I have never made it from scratch before but I figured it couldn't really be all that hard.  

After checking several recipes I decided to follow this one because if looked so easy and I figured it was best to start with an easy recipe and tweak it later if it needs it.  The only change I made to the recipe was to add salt and pepper to the corn starch.  Yes...you heard it....corn starch.  The chicken is dredged in corn starch instead of flour, which makes for a light and crispy crust.  Trust me, it will work!

Give it a try and serve with white rice and broccoli or stir fried veggies!  Your kids will love it, you will too, and it will save you the money you would spend on chinese take-out!!

Orange Chicken (adapted from America's Test Kitchen)
Serves 4

Marinade and Sauce:
1 1/2 pounds boneless, skinless chicken breasts, trimmed and cut in 1 1/2-inch pieces
3/4 cup low-sodium chicken broth
3/4 cup orange juice , plus 1 1/2 teaspoons grated zest 
6 tablespoons distilled white vinegar
1/4 cup soy sauce
1/2 cup packed dark brown sugar
3 medium cloves minced garlic
1 tablespoon fresh grated ginger 
1/4 teaspoon cayenne pepper
1 tablespoon cornstarch

Coating:
3 large egg whites
1 cup cornstarch
1/2 teaspoon salt
1/2 teaspoon ground pepper
1/4 teaspoon cayenne pepper
1/2 teaspoon baking soda
3 cups peanut or canola oil

FOR THE MARINADE AND SAUCE
Place chicken in 1-gallon zipper-lock bag; set aside. Combine chicken broth, orange juice, grated zest, vinegar, soy sauce, sugar, garlic, ginger, and cayenne in large saucepan (with at least 3-quart capacity); whisk until sugar is fully dissolved. Measure out 3/4 cup mixture and pour into bag with chicken; press out as much air as possible and seal bag, making sure that all pieces are coated with marinade. Refrigerate 30 to 60 minutes, but no longer.

Whisk the cornstarch into the remaining mixture and bring to a boil over high heat.  Simmer sauce, stirring occasionally, until thick and translucent, about 1 minute.  Set sauce aside.

FOR THE COATING: 
Place egg whites in pie plate; using fork, beat until frothy. In second pie plate, whisk cornstarch, cayenne, salt, pepper, and baking soda until combined. Drain chicken in colander or large mesh strainer; thoroughly pat chicken dry with paper towels. Place half of chicken pieces in egg whites and turn to coat; transfer pieces to cornstarch mixture and coat thoroughly. Place dredged chicken pieces on plate and repeat with remaining chicken.

TO FRY THE CHICKEN: 
Heat oil in 11- to 12-inch Dutch oven or straight-sided sauté pan with at least 3-quart capacity over high heat until oil registers 350 degrees on instant-read or deep-fry thermometer. Carefully place half of chicken in oil one piece at a time; fry until golden brown, about 5 minutes, turning each piece with tongs halfway through cooking. Transfer chicken to large plate lined with paper towels. Return oil to 350 degrees and repeat with remaining chicken.

TO SERVE: 
Reheat sauce over medium heat until simmering, about 2 minutes. Add chicken and gently toss until evenly coated and heated through. Serve immediately.

Recipe shared on:

Wednesday, September 26, 2012

S'mores Cookies


Guess what I made....


S'mores Cookies!!!!  I saw this container filled with mini marshmallow bits at the store and couldn't resist. Once I was home I thought to myself "what the heck am going to make with these"?  Then I remembered seeing a post for these cookies by Jess over at "On Sugar Mountain" and I knew I had to try them! 


So I gathered my ingredients and got my taste testers lined up.  It is so hard to find friends willing to act as my taste testers (she says, dripping with sarcasm) but I was able to find some fellow ASL students who were carpooling with me to the state capitol for an ASL event and were willing to sacrifice themselves to try my cookies!  


I used these mini kisses instead of chocolate chips but I will warn you that it was torture....so hard not to eat the whole bag while the rest of the dough was being prepared!

I was very interested to see that the graham crackers were actually added to the dry ingredients.  Definitely gave the whole cookie that graham flavor that I love!!


Here is where I will give you a VERY serious warning.......this cookie dough is addictive!  Don't take this warning lightly, you will really have to use all of your self control, and make sure you bake all of the cookie dough right away.....because if you don't, I GUARANTEE you will want to eat it ALL!!!


The big surprise for me with this recipe were all of those wonderful little mini marshmallows.  Straight out of the container they are hard and a little crisp.  I was worried that they would be more like marshmallow chips in the cookie.  Once they were baked they held their shape but became soft little gooey marshmallows!  


These were definitely taste tester approved!  They went over so well that I made them a second time that week for a weekend trip to a friends cabin.  I made them with the kids in mind but the other adults at the cabin kept hiding the container of cookies and saying they were just too good to share with the kids!  ;D


I hope you try these cookies!  If you are a s'mores lover like myself you will really want to give them a try.  Make them for the kids AND the adults because I guarantee that no one will be able to resist!  Just remember to pace yourself, these are REALLY addictive and there is no 12 step program for cookies!!  

S'mores Cookies (via On Sugar Mountain)

1/2 cup butter, room temperature
1/2 cup white sugar
1/4 cup brown sugar
1 egg
1 tsp vanilla
1 1/3 cups flour
3/4 cup graham cracker crumbs, finely processed
1 tsp baking powder
1/2 tsp salt
1 cup mini Hersey's Kisses (or regular chocolate chips)
1 cup Mallow Bits

Preheat oven to 350 degrees and line cookie sheets with parchment paper (I used my lovely Silpats)

Cream butter and both sugar until well incorporated. Beat in egg and vanilla. Meanwhile in a separate bowl sift together the flour, graham cracker crumbs, baking powder, and salt.

Add dry ingredient mixture to wet ingredient mixture and stir until dough comes together. Stir in chocolate chips and mallow bits.

Drop rounded tablespoonfuls of dough onto prepared baking sheets and bake at 350 for approximately 10 minutes or until edges begin to brown. Let cool on pan for 2 minutes before removing to wire rack to cool completely.

Yield: roughly 2 dozen cookies

This recipe shared on:


Thursday, September 20, 2012

Chocolate Swiss Meringue Buttercream


Yes.....I know, I have a problem!  I blame my good friend Monica Hobbs (caterer extraordinaire).  It's sad when our friends lead us down the path to addiction....but there you have it.....I am addicted to Swiss Meringue Buttercream!  I'm sure there isn't a 12 step program for this, but there probably should be.


It all started so innocently....I was helping her with an event at her venue, the beautiful Nimitz Mansion (shameless plug), and she asked me to make the frosting for her cupcakes.  This was way back before I was into eating cupcakes (less than a year ago) and I had never tasted her frosting.  So I followed her instructions and they seemed simple enough until this huge mixture began to have a horrible curdled look to it.  I panicked.....Monica did not...she said "just wait, leave it alone and let it keep whipping and it will all come together".  I had very little faith but did as I was told and what do you know.....this gorgeous, glossy frosting appeared before me.  That was all fine until I tasted it.....HEAVEN!!!  I was hooked! This is the lightest buttercream.....it is not too sweet, melts in your mouth, has a beautiful glossy look to it, and pipes perfectly!  Oh, let's not forget, you can flavor it with anything you like and tint it with any color you like!


It just made sense that as I started making cupcakes for my blog, I would start experimenting with this frosting.  There are not many different recipes out there, most of them use the same ingredients and the same amounts of each ingredient.  I needed a written recipe to follow the first time I made it on my own and I chose Martha Stewart's recipe from her website.  This makes a basic Swiss Meringue Buttercream to which you can add anything.  I used the plain version of this for my Angry Bird Cupcakes and Mario Brothers Cupcakes.  You have also seen me add my homemade caramel sauce and even store bought caramel sauce for my Toffee Crunch Cupcakes.  All with great success!


For this particular cupcake I wanted to try chocolate.  I had never done this before, so I had to guess on the amounts of chocolate to use.  I started by melting 8 oz of really good quality dark chocolate (72%) over a double boiler and then putting it aside to cool to room temperature.  Then, when the frosting was just past it's "curdled" stage I added vanilla and the melted chocolate.  I added a little chocolate at a time and tasted as I went along to see how flavorful it was.  I ended up using all 8 oz and the flavor was great, definitely chocolatey but not too rich and not overpowering.

I used this frosting on my Vanilla Bean Cupcakes and they were a perfect match.  This was not a heavy, too sweet cupcake.  It was light and yummy with clean flavors, easy to eat too many of them at one time (big problem, I know)!


You have to try this frosting!  Make any flavor you wish and I guarantee you will become addicted like I am!!

Enjoy!

Chocolate Swiss Meringue Buttercream (Adapted from Martha Stewart)

5 large egg whites
1 cup plus 2 tablespoons sugar
Pinch of salt
1 pound (4 sticks) unsalted butter, cut into tablespoons, room temperature
1 1/2 teaspoons pure vanilla extract
8 oz quality dark chocolate, melted and cooled to room temperature

Combine egg whites, sugar, and salt in the heatproof bowl of a standing mixer set over a pan of simmering water. Whisk constantly by hand until mixture is warm to the touch and sugar has dissolved (the mixture should feel completely smooth when rubbed between your fingertips).

Attach the bowl to the mixer fitted with the whisk attachment. Starting on low and gradually increasing to medium-high speed, whisk until stiff (but not dry) peaks form. Continue mixing until the mixture is fluffy and glossy, and completely cool (test by touching the bottom of the bowl), about 10 minutes.

With mixer on medium-low speed, add the butter, a tablespoon at a time, and continue mixing. Do not get concerned if the mixture begins to look curdled, just keep beating and it will soon come back to a smooth and glossy frosting.  Once all butter has been added, mix in vanilla and melted chocolate. Beat until frosting is completely smooth. Keep buttercream at room temperature if using the same day.


This recipe is shared on:
Foodie Friends Friday
My Turn for Us: Linky Party
Chocolate, Chocolate and More "Thursdays Treasures"

Monday, September 17, 2012

Snickerdoodle Cupcakes


I did it, I did it,  I did it!!!  I have been wanting to make Snickerdoodle cupcakes for the last 3 years, ever since I saw the recipe in a Martha Stewart Cupcake Cookbook.  My youngest son, Max, LOVES snickerdoodle cookies and I really wanted to make them into cupcakes for him.  These cupcakes have been on my "to do" list for so long that I really thought I would never make them.

I decided to make the cupcake Martha's way for my first try.  I read all of the reviews I could find and everyone loved her cupcake but wished they had used a different frosting.  The suggestion was to go with a cream cheese frosting rather than her seven minute frosting.  I LOVE cream cheese frosting but I'm also a big fan of seven minute frosting.  Such a dilemma!!  I think the problem really isn't seven minute frosting so much as HER recipe for seven minute frosting.  I find it to be lacking, not sweet enough and not enough vanilla flavor.  Mine tastes very much like marshmallow fluff and I can see that being perfect with a cinnamon cupcake.  But I decided to follow the reviews and go with a cream cheese frosting with a hint of cinnamon in it!

The second time I baked these (also known as the "perfect time") I used my vanilla bean cupcake recipe but omitted the vanilla beans and added cinnamon.  Very light, fluffy, and delicious!!  Perfect with my frosting and it tasted very much like a Snickerdoodle!!!  These cupcakes did not last long at the party!

I can see Max requesting these cupcakes all the time (he did eat two in a row, even though he "doesn't like" cupcakes)!

Enjoy!!

Snickerdoodle Cupcakes

The Cupcake:  (recipe adapted from cupcakeproject.com)
Yield: 16 cupcakes (I doubled it to get 32)

1 cup (225 grams) granulated sugar
1 3/4 cups (175 grams) cake flour, not self-rising
1 1/2 teaspoons baking powder
1/2 teaspoon baking soda
1/2 teaspoon salt
1 Tablespoon cinnamon
1/4 cup (57 grams) unsalted butter, room temperature
2 large eggs, room temperature
1/3 cup (75 grams) full-fat sour cream
1/4 cup canola oil or vegetable oil (60 ml)
1 tablespoon pure (not imitation) vanilla extract
2/3 cup (160 ml) whole milk

Preheat oven to 350 F (175 C).
In a medium-sized mixing bowl or bowl of a stand mixer, mix together cake flour, baking powder, baking soda, salt, and cinnamon.  Add the sugar and mix until well combined.  Add butter and mix on medium-low speed for three minutes.  Because there is so little butter, you'll end up with a very fine crumb texture.

In a small mixing bowl, whisk together eggs, sour cream, oil, and vanilla extract until smooth.
Add the egg mixture to the flour mixture and beat on medium speed until just combined.
Slowly add milk and mix on low speed until just combined.  The batter will be liquid.  (Don't worry, you didn't do anything wrong.  It's supposed to be that way.)

Fill cupcake liners 2/3 full, bake for 14 minutes and then test to see if they are done. They are done when a toothpick comes out without wet batter stuck to it.  When the cupcakes are done, remove them immediately from the pans and cool on a rack.


Cinnamon Cream Cheese Frosting:

8oz Cream Cheese
1 stick butter, softened
1 1/2 teaspoons vanilla
1 tablespoon cinnamon
4 cups Powdered Sugar

Beat together the cream cheese and butter until smooth, add the vanilla and cinnamon and beat until mixed in.  Add powdered sugar and beat until fluffy.

Assemble Cupcake:

2 Tablespoons sugar
1/2 teaspoon cinnamon

To finish, combine remaining 1/2 teaspoon cinnamon and 2 tablespoons sugar. Using a pastry bag fitted with a tip, pipe frosting on each cupcake. Using a small, fine sieve, dust peaks with cinnamon-sugar.

This recipe shared on:
Lemon Sugar
Foodie Friends Friday
My Turn For Us: Linky Party


Wednesday, September 5, 2012

Zabaglione and Berries - My Newest Love


I love to bake and cook....all the time.....everyday!  I am so comfortable in the kitchen working with food, trying new recipes, creating something that makes people happy and excited to eat it!  Unfortunately, there are days when I have no idea what I should make.  That is why I get so excited when someone approaches me and asks me to make something new.  Pull me out of my comfort zone and put the pressure on a bit.  I had a friend ask me make a romantic anniversary dinner for her and her husband.  When we were discussing menu options I asked if there was a special dessert that they both loved.  She told me of a special dessert they had together in Banff 25 years ago.  They both fell in love with this dessert but had not had it since.  That special dessert.....Zabaglione!

Zabaglione is a light, creamy, Italian custard, made with very few ingredients.  You only need egg yolks, sugar and a sweet wine (usually Marsala). These ingredients are whipped over bowl of simmering water until the mixture is creamy, lightened in color and tripled in volume.  It can be served warm or you can fold some whipped cream into it to give it a little more body and refrigerate it.  Either way, it is delicious and addictive!  

I found a newspaper article written by Mario Batali entitled "The king of custards, Sicilian style" for the Chicago Tribune.  It includes Mario's recipe which is a fairly traditional recipe.  I strayed only a little from the traditional in that I added fresh vanilla bean paste to the mixture before I began whipping.  I can't help myself....I really love vanilla beans!  (don't worry....I'm looking into a 12 step program)  ;)


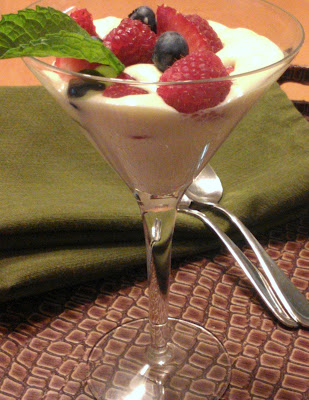
Zabaglione is a custard-like sauce, but don't expect it to be thick like a custard.  This is a much lighter, creamier sauce that can be the "main" show or can be the accent to a dish.  Some ideas for serving your Zabaglione:

serve it in a gorgeous martini or wine glass, topped with fresh fruit
spoon a dollop on top of any fruit pie or tart (as a rich substitute for whipped cream)
layer into any fruit trifle
use in your favorite tiramisu recipe


These are just a few ideas for enjoying your Zabaglione.  As you can see, I enjoyed mine with fresh berries and an almond biscotti!  I'm just happy that no one was around when I was eating it....licked that martini glass clean!!  ;)

So......what will you do with your Zabaglione?  Let me know what you make!  

Zabaglione with Berries

Yields: 8

Ingredients: 
8 large egg yolks, at room temperature
2/3 cup sugar
1/4 cup  marsala 
1/2 teaspoon vanilla bean paste
1 cup whipping cream, chilled

Put a mixing bowl in the fridge to chill.

Fit a heatproof bowl over a saucepan of barely simmering water, making sure the bottom of the bowl does not touch the water. (Or use a double boiler.)

Place the egg yolks, sugar, vanilla paste, and marsala in the heatproof bowl; whisk together well. Using an electric mixer, beat the mixture until it is pale and thick, about tripled in volume and happily frothy. (This can take up to 10 minutes. Be careful not to let the water boil beneath the bowl; it should stay at a high simmer.)

Remove the bowl from the pan of simmering water; place it on a cold surface or stand it in a pan of cold water. Whisk constantly until the mixture is cool; set it aside.

In the chilled mixing bowl, whip the cream until it reaches firm peaks. Fold about a third of the whipped cream into the egg mixture to lighten it. Then gently fold in the rest of the whipped cream.

Serve immediately or store in the refrigerator for up to 4 hours.

Recipe adapted from Mario Batali

This post shared on:
featured at  freedom friday