Saturday, December 31, 2011

Oliebollen


Oliebollen are a Dutch treat that are traditionally made and served on New Years Eve.  These deep fried doughnut balls contain apples and raisins and are dusted with powdered sugar.  Now for our history lesson: They are said to have been first eaten by Germanic tribes in the Netherlands during the Yule, the period between December 26 and January 6. The Germanic goddess Perchta, together with evil spirits, would fly through the mid-winter sky. To appease these spirits, food was offered, much of which contained deep-fried dough. It was said Perchta would try to cut open the bellies of all she came across, but because of the fat in the oliebollen, her sword would slide off the body of whoever ate them, leaving them unharmed. (The moral of the story- eating doughnuts could save your life!)

The Dutch have been eating oliebollen (oil balls) since the mid 19th century.  The Dutch settlers introduced these treats to the U.S. and over time they morphed into what we today call the Doughnut!  Whether all of these stories are true or not, these little balls are lekker (yummy)!!  Hope you enjoy!

Obviously this is a Dutch recipe and so the ingredients are listed by weight rather than volume.  If you do not have a kitchen scale I would suggest you get one (they are necessary for the home baker) or use the internet to convert.

Oliebollen


500 grams flour
100 grams raisins or currents
1 apple, peeled and chopped
zest of one lemon
1 tablespoon sugar
1/2 teaspoon cinnamon
1 teaspoon yeast
150 grams beer
350 grams lukewarm water
powdered sugar (for dusting the top)


Mix all ingredients together and stir in the water. Cover the bowl and allow to rise in a warm place for one hour.


Bring pot of vegetable oil up to 190 degrees C (375 degrees F).  Using a large ice cream scoop, drop the batter into the oil and fry until golden brown, turning them if necessary.  


Dust with powdered sugar and serve!


Friday, December 30, 2011

Crunchy Granola


I have recently been introduced to the wonderful world of Greek yogurt.  For those of you who have never tried it, greek yogurt is creamy and smooth and thicker than plain yogurt and it is a little bit on the tart side, but in a good way.  My favorite way to eat it is with fresh berries and crunchy granola.  The granola adds a great texture and all the sweetness you will need to balance the tartness of the yogurt.  YUM!  

Of course you do not have to put this granola over yogurt, you could put it over your ice cream, sprinkle it over your pancakes or waffles, sprinkle it on your muffin batter before you pop them in the oven, or you could just eat it as cold cereal with some milk.  Give the recipe a try and tell me what you think!

Crunchy Granola

3 cups old-fashioned rolled oats
1/2 cup slivered almonds
1/2 cup walnut pieces 
1/2 teaspoon cinnamon
1/4 teaspoon salt
4 tablespoons b!utter
1/3 cup honey
2 tablespoons brown sugar
1/2 teaspoon vanilla extract
1/2 cup dried blueberries, raisins, chopped dates, cranberries or a combination 
1/2 cup flaked coconut (optional)

Preheat oven to 325 degrees F.

In a large bowl stir together oats, almonds, walnuts, cinnamon and salt.  

In a small saucepan melt butter with honey and brown sugar over low heat, stirring.  Add vanilla and pour mixture over oat mixture and stir until combined well.

On a large baking sheet, spread the granola evenly in a thin layer.  Bake, stirring every 5 minutes to keep from sticking or burning, until golden brown and crisp, about 20 minutes.  (Do not overcook; the granola will crisp more when cooled).  Cool the granola on the pan and then stir in the dried fruits and coconut.  Granola may be kept in an airtight container at room temperature for up to a week.

Makes about 5 cups


Thursday, December 29, 2011

Lavender Shortbread


Lavender is one of my favorite flowers and a fabulous herb to cook with.  It is  is a member of the mint family and is close to rosemary, sage, and thyme.  I have been cooking with it for years in my favorite, Herbs de Provence, but have never baked with it before today.  I was inspired to make these cookies by my favorite caterer, Monica Hobbs of the Nimitz Mansion on  Yerba Buena Island, because she makes a fabulous Lavender Shortbread with a maple and mascarpone glaze that is to die for.  I am still trying to find where I put her recipe but until I do I am playing around with other recipes that are on internet and twisting them to make them my own!

This recipe is what I have come up with after a bit of trial and error.  I considered a shortbread with just the lavender but I have so many lemons right now and truthfully I love how lemon zest looks and the tartness it adds to a cookie. This recipe is made in a food processor but feel free to make it in a stand up mixer or even a bowl with a hand held mixer.  Just make sure that after you form your logs they stay in the freezer until they are nice and solid, otherwise I found them to spread a bit.  You can roll the logs in sugar and lavender before you slice them but watch to make sure this doesn't cause the edges to brown more quickly.  I hope you enjoy the recipe!  I will keep looking for Monica's recipe and we can give that one a try when I find it!

LAVENDER SHORTBREAD

2/3 cups sugar
2 sticks butter, softened
1 tablespoons dried culinary lavender
½ teaspoon salt
Zest of 1 lemons
Juice of ½ a lemon
½ teaspoon real vanilla extract
2 cup all-purpose flour

Directions:
Add the butter and sugar to the food processer bowl and mix until light and fluffy, about 30 seconds. Add the salt, lavender, lemon zest, lemon juice, and vanilla extract and pulse until combined and the lavender is chopped scraping down the bowl as needed, about 20 seconds. Add the flour and pulse until just combined.

Turn dough out onto a clean surface and knead a couple of times to combine. Cut dough in half and form into logs.  Wrap with plastic wrap and freeze until solid.

Preheat the oven to 350 degrees. Cover two large cookie sheets with parchment paper.

Take a sharp knife and slice ¼ inch thick. Place an inch apart on baking sheet and bake for 10 minutes until golden around the edges. Let set one minute and transfer to a cooling rack.

Think ahead: Shortbread logs can be frozen for up to 1 month. Thaw slightly before slicing. Baked cookies can be stored in an airtight container for up to a week.

(can roll logs in a sugar/lavender mixture before slicing if you choose)

Adapted from Thecookingphotographer.com

If you are looking for the best caterer in the world with the most beautiful venue - http://www.nimitzmansion.com/

Friday, December 23, 2011

Chocolate Chip Cookies

During my baking extravaganza with Max he decided he really needed to make "his" chocolate chip cookies.  Really this is MY recipe but with the addition of his secret ingredient.  I'm not sure if it's normal for a 12 year old boy to think of Espresso as a good secret ingredient but Max likes to be different so here you have it.  My  recipe is similar to every other recipe out there for chocolate chip cookies except that I use a lot more brown sugar than regular sugar and I also add more flour.  I like a thick, chewy cookie instead of a crispy cookie.  I would like to say that I'm famous with all the kids in town for these cookies but the truth is I am famous for this cookie dough.  It is the most requested thing I make by all of the kids and there is rarely enough dough left over to bake any of them.  It is DELICIOUS!!   
I have given you my recipe below and added Max's "secret" to the end.  The pictures are all from his batch so I will have to add photos later when I make a regular batch.  Feel free to make them plain or with the addition, either way they are super yummy!  I will warn you that if you add the espresso you might not want to eat these late at night or you will never get to sleep!  btw- I did warn you all that he was trying to overthrow me from the blog, if I'm not careful it will happen!

Chocolate Chip Cookies

2 sticks butter
1 cup brown sugar
1/2 cup granulated sugar
1 teaspoon salt
2 teaspoons vanilla
2 large eggs
2 1/2 cups all-purpose flour
1 teaspoon baking soda
12 oz semi-sweet or bittersweet chocolate chips or chunks (my favorite)

Preheat the oven to 350 degrees F.

In a mixer, cream butter with the two sugars until fluffy and light.  Add the vanilla and eggs and beat until fully blended.

In a large bowl, whisk together the flour, baking soda and salt.  Add to the creamed butter mixture just until mixed.  Mix in the chocolate chips.

Scoop cookies using a large ice cream scoop onto a silpat lined baking sheet leaving 2 inches between cookies.  Bake until golden brown and set approximately 13-15 minutes (depending on the size of your scoop). 

To make these Max's cookies- Add 1-2 Tablespoons of instant espresso powder into the batter when you add the eggs.  Try not to eat too many or you will never get to sleep again!

Thursday, December 22, 2011

Nutterbutter Snowmen


I know, I know, I know.....two posts in one day is a bit much!  If it were up to Max (my 12 year old son) I would have at least 4 different posts today, he is still threatening to take over the entire blog!  It's actually quite sweet, every time he goes in the kitchen he says "Mom...get the camera and take pictures of me so we can put it on the blog!"  I promise not to post them all because really, who wants to see my son make bacon and hot chocolate?  So I saw these cookies on my favorite blog http://www.browneyedbaker.com/ and decided they would be so much fun to make with the kids.  There is no baking involved, just melting and decorating and fun!
I bought vanilla melting candies made by Guittard but you can use Wilton melting chips or whatever brand your stores carry.  Have fun decorating!  Here is a picture of Max (per his request) hard at work!


Nutter Butter Snowmen
Nutter Butter cookies
White candy melts (vanilla flavored)
M&M candies
Small tube black decorating gel

Line a baking sheet with wax paper; set aside.
In the top of a double boiler, melt the white candy melts according to the package instructions.
Working one at a time, dip a Nutter Butter cookie into the melted coating and flip it over to coat completely (a fork is great for this). Remove and let any excess drip off then place on the wax paper-lined baking sheet. Repeat with the remaining Nutter Butter cookies. Place the baking sheet into the refrigerator for at least 30 minutes so the coating can set.
Dab a small amount of black gel on one side of an M&M and place on the coated cookie. Repeat with another just below to make the two “buttons”.
Dab another small amount on the bottom of a small piece of the orange m&m's (which I cut into fourths) and affix to the center of the top of the cookie for the nose. 
Now squeeze out small dots for the eyes and the mouth. Ta-Da! Snowmen!
Adapted from browneyedbaker.com

Chocolate Almond Toffee

Today is a very busy baking day for me but I was really in the mood to give the oven a break for a few minutes and make toffee!!  I love caramel, chocolate and almonds, so any recipe that combines them all has no chance to make it long in my house.  I have never used this recipe before but it was really simple to make. Just make sure that you have a candy thermometer to help you out.
Since I haven't made this before I followed the directions exactly including all of the times and the toffee turned out perfect!!
I literally poured the hot toffee mix onto my silpat (this way I didn't need to use oil or spray) and spread it a bit.  I didn't form it into any perfect shape, just spread it out and then spread the melted chocolate on top!  I like that the pieces are not perfectly shaped, to me the imperfections make the candy even more fun!  Enjoy the recipe....let me know how yours turns out!

Chocolate Almond Toffee
  • 1 cup whole unblanched almonds
  • 1 1/4 cups sugar
  • 1/3 cup light corn syrup
  • 1/3 cup rum (I used Malibu Rum)
  • 8 ounces (2 sticks) butter cut into small pieces
  • 1 teaspoon salt
  • 1/2 teaspoon baking soda
  • 8 ounces bittersweet chocolate, cut into small pieces

Directions

Position rack in center of oven and preheat oven to 375 degrees F.
Spread nuts on a baking tray and bake until toasted, 10 to 15 minutes, turning as they toast.  Remove from oven and chop into course pieces. 
Clean baking tray and coat with vegetable oil spray or use a silpat. Spray both sides of the wooden spoon with vegetable oil spray. Set aside.
Make the toffee: Place sugar in a small deep saucepan. Add the corn syrup and rum and, over medium heat, bring to a boil. Let boil until large bubbles form on the surface, 3 to 4 minutes. Cover with foil and boil 5 minutes longer.
Add the pieces of butter and continue cooking, uncovered, over medium heat until temperature reaches 300 degrees F on a candy thermometer, about 30 minutes.  Remove from heat and immediately add the salt, baking soda, and 3/4 cup of chopped nuts. Stir with a wooden spoon until well combined.
Pour the toffee mixture on the oiled baking tray and spread the mixture out, making a block about 10 by 13 inches. The toffee will thicken very quickly, so work as fast as you can. When cool, blot some of the oil or vegetable spray with a clean towel.
While the toffee mixture is cooling, melt the chocolate in a medium heatproof bowl placed over simmering water. When almost melted, turn off heat and let the chocolate continue to melt, stirring occasionally.
Spread the chocolate onto of the toffee, spreading to cover the entire surface and before the chocolate cools, sprinkle with the remaining chopped nuts.
When the toffee and chocolate have cooled and hardened completely, either break or cut toffee into pieces and serve!
Recipe adapted from Foodnetwork.com


Tuesday, December 20, 2011

Knot Yeast Rolls


Yes....it's a yeast roll!  No....it's not hard to make!  People have these crazy ideas that yeast dough is difficult to work with but there are a lot of really easy recipes for yeast breads.  These rolls are my families all time favorite rolls to make.  It probably doesn't hurt that we are all carbo-holics and will eat any kind of bread but these are just so yummy.  There is a hint of sweetness from the brown sugar and a nice buttery flavor and they are fabulous just out of the oven!
When you are making the rolls it is important to know that it is a pretty wet dough.  It looks like it will never form a shape at first but then you add the rest of the flour and knead it on a heavily floured surface.
I probably knead the dough in a good 1/4 - 1/2 cup of flour.  You will know you have enough when the dough stops sticking to your hands and the counter.
 
We like to shape the rolls into knots (hence the name) but feel free to make any shape you prefer!  I personally think the knots look fancy and since I serve these at every holiday meal I want them to look like they took a lot of effort.  Even though they don't, it is usually the kids job to tie them into knots!  Super easy!

Knot Yeast Rolls

1 package active dry yeast
1 cup warm milk (110 to 115 degrees F)
1/4 cup butter, melted
1/4 cup packed brown sugar
3 eggs
1 teaspoon salt
3 1/2 cups all purpose flour
1 tablespoon water

In a mixing bowl, dissolve yeast in warm milk.  Add the butter, brown sugar, 2 eggs, salt and 2 cups flour.  Beat until smooth.  Stir in enough remaining flour to form a soft dough.  Turn onto a floured surface; knead until smooth and elastic, about 6-8 minutes (add as much flour as needed to keep it from sticking to your hands).  Place in a buttered bowl, turning once to grease top.  Cover and let rise in a warm place until doubled, about 1 hour.

Punch dough down.  Turn onto a lightly floured surface; divide into 16 pieces.  Roll each into a 12" rope, tie each into a knot.  Place on greased baking sheets.  Cover and let rise until doubled, about 30 minutes.  Beat remaining egg with water and brush over dough.  Bake at 350 degrees F for 15-20 minutes or until golden brown.

Makes 16

Adapted from allrecipes.com

Monday, December 19, 2011

Mushroom and Caramelized Onion Tart

I may not have mentioned this before but most of the time I work at home.  This has it's great advantages and disadvantages. The advantages are that I am always around when my kids need me, I can work in my jammies and my slippers all day long and I can arrange my work schedule to fit my school schedule.  There are only a couple of disadvantages and the biggest of them all is.....the kitchen is here!  The oven calls my name....making me think about all the things I can make!  Today is no exception.  I have all of these beautiful mushrooms that need to be cooked and I have the second half of a pastry recipe that I either need to use or freeze.  I guess this means we are making a mushroom tart!!

I got as far as par-baking my pastry crust in the tart pan when I realized that not only have I never made a mushroom tart before but I do not even have a recipe for one.  What I do have is a love for all things caramelized and so I did that to some onions and found a block of Gruyere cheese in the the refrigerator (if you know me well, you will know that it is like a cheese shop in my refrigerator, probably another obsession of mine I'm sure).
The following recipe is what I came up with on the fly this morning!  It was a fabulous lunch and will likely be a fabulous dinner as well.  My only regret is that it is too early in the day to have a glass of wine with this tasty treat!  I hope you enjoy it!


Mushroom and Caramelized Onion Tart

1 flaky butter crust (store bought or homemade)
½ medium onion, sliced
3 tablespoons butter
2 cups sliced mushrooms
3 large eggs
¾ cup heavy cream
½ teaspoon salt
¼ teaspoon black pepper
1 tablespoon fresh thyme
Pinch of ground nutmeg
1 cup grated Gruyere cheese

Preheat oven to 350 F.

Prepare tart shell.  Roll out dough to an 11 inch circle and transfer to 9 inch tart pan with removable sides, trim crust.  Refrigerate for 30 minutes.  Line the pastry with parchment paper and fill with pie weights or dried beans.  Bake until the crust is set, about 12 minutes.  Remove the weights and bake another 8 - 10 minutes.  Remove from oven and set aside.

In a medium skillet, cook the onions in 2 tablespoons of the butter over medium-low heat.  Cook while stirring often, until caramelized.  About 15 to 20 minutes.  Put onions in the bottom of the pie crust.

Using the same skillet, cook the mushrooms in the remaining 1 tablespoon of butter over medium-high heat until tender and beginning to brown.  Remove and add to the crust with the onions.

Sprinkle the cheese on top of the mushrooms and onions.

Combine eggs and the cream in a bowl and whisk well.  Add the salt, pepper, nutmeg and thyme.  Whisk to combine.  Pour into the tart shell and bake until risen and golden brown, about 35 minutes.


Let me know if you need me to publish a recipe for pastry dough...I have one that I love and have used for as long as I've been baking!

Saturday, December 17, 2011

Cinnamon Scones


Really these should be called Max's Scones because they are his favorite and he makes them more often than I do.  In our home Max and I are in charge of all the baking and coming up with new recipes.  If I'm not careful I will lose this blog to him, he has all sorts of ideas of what he would like to bake for the blog!  My oldest, Zack, finds all of this to be "too much work" (his catch phrase) and so he is in charge of quality control.  This basically just means that he eats everything we make faster than we can make it.  I almost didn't get pictures of the finished product before he snagged them all!
This is the easiest recipe and one of our favorites.  Some people get scared away from a recipe just because you have to cut in the butter.  But truly anyone can do this.  If you don't have a pastry cutter then use a fork or  two knives or rub the butter into the flour with very cold hands!
The last step is to add cinnamon sugar before baking.  Do NOT skimp on this step.  There is very little in the dough to sweeten it (only 3 T of honey) so you will get all of your sweetness from the topping!


Cinnamon Scones

2 cups flour
2 teaspoons baking powder
½ teaspoon baking soda
¼ teaspoon salt
½ cup butter
1 egg, separated
3 tablespoons honey
1/3 cup buttermilk

1 teaspoon water
2 tablespoons sugar
¼ teaspoon ground cinnamon

Preheat oven to 400 degrees.

In a large bowl, stir together flour, baking powder, baking soda and salt.  Cut in butter until mixture is consistency of course crumbs.

In a small bowl, beat egg yolk with honey and buttermilk.  Add buttermilk mixture to flour mixture, mixing lightly just until it clings together.

With floured hands, lightly shape dough into flattened ball.  Roll out or pat out to a circle about 8 ½ inches in diameter.  Cut into 8 equal wedges.  Place on nonstick baking sheet.

In a small bowl, beat egg white with water. In another bowl, blend sugar and cinnamon.  Brush scones lightly with egg white, then sprinkle with cinnamon sugar.  Bake until slightly golden…9 minutes.

Recipe from California Culinary Academy Bread Book (via my Chef friend, Suzette Page)

Recipe shared on:
My Turn For Us - Freedom Fridays

Friday, December 16, 2011

Thumbprint Cookies

I suppose I have a little bit of an obsession with butter.  A friend asked me for a banana bread recipe the other day and after receiving the recipe replied "I like any recipe that involves a 1/2 pound of butter".  I'm not sure if she was joking or not but I realize that most people might be a little shocked at the copious amounts of butter I use in all recipes.  This recipe is no different as you can see....half a pound of butter to only two cups of flour does seem like a lot; but I guarantee these cookies are to die for and worth every single calorie!
 So you will notice that you need to use a vanilla bean in the recipe.  If you would rather use vanilla extract you can but the vanilla bean is just so yummy in these cookies...pretty too as you can see all the little seeds in the cookies!
I love to fill my thumbprint cookies with raspberry jam but my son Max always fills his with Nutella or homemade hot fudge sauce!  

Thumbprint Cookies

1/2 pound butter, softened at room temperature
2/3 cup sugar
1/2 vanilla bean, soft insides scraped out
1/8 teaspoon salt
2 cups plus 2 tablespoons all purpose flour
1/4 cup raspberry, apricot, or another jam, Nutella, or lemon curd

Preheat oven to 350 degrees.

In a mixer fitted with paddle attachment cream the butter and sugar together until fluffy.  Add the vanilla scrapings and salt and mix until incorporated.  Add the flour and mix at low speed until incorporated.  

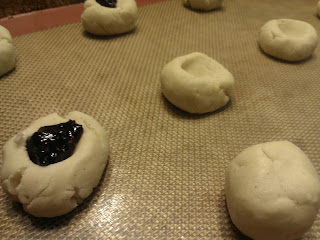
Using your hands, roll the dough into 1 1/2 inch balls and arrange them 2 inches apart on cookie sheet.  Using your thumb, press the top of each cookie to make a shallow well.  Fill the wells with jam.  

Bake until very lightly browned around the edges, about 12 minutes.  Let cool on the pan and store in an airtight container.

Enjoy!


Thursday, December 15, 2011

Tiramisu


For the past four years I have been part of a cooks club that is made up of a group of wonderful women brought together by their love of great food and a need for a ladies night out!  We meet every other month at one of our homes and the hostess sets the theme which we must all follow.  We have had crock pot night, vegetarian night, country cooking, mardi gras, BBQ, etc.  Everyone makes a dish within the theme and brings the food along with their recipe to share with the other ladies!


This month our theme is "The Twelve Days of Christmas".  I snagged "Nine Ladies Dancing" and decided to make a dessert with Ladyfingers.  I know it was the obvious choice but I don't care...I  LOVE Tiramisu and I had to make it!  How can you not love a dessert that has cheese, alcohol and chocolate in it!!


I kept the name Tiramisu even though the name should reflect "Nine Ladies Dancing".  What can I say...I used all of my espresso in the Tiramisu and didn't get my caffeine jolt to get the brain working this morning!  If anyone has suggestions for a cute name....leave a comment and let me know!  I'll let you all know which name I decide to use tonight!


Tiramisu

1 ½  cup brewed espresso coffee
¼ cup Kahlua
1 teaspoon vanilla extract
1/3 cup sweet Marsala
5 egg yolks
½ cup sugar
1 pound mascarpone
1 cup chilled heavy cream
36 ladyfingers
Bittersweet chocolate bar

Stir together espresso, Kahlua, and vanilla in a small bowl and set aside. 

Beat egg yolks, Marsala, and 1/2 cup sugar in a heatproof bowl set over a saucepan of  simmering water using a whisk or handheld electric mixer until tripled in volume, 5 to 8 minutes. Remove bowl from heat. Beat in mascarpone until just combined.

Beat cream in a large chilled bowl until it holds stiff peaks. Fold the whipped cream into the mascarpone mixture gently but thoroughly.
.
Dip each ladyfinger into coffee mixture (quickly so that they do not become too moist) and arrange in a single layer in the bottom of a 9 by 13-inch glass baking dish.  Spread half of mascarpone filling evenly on top of ladyfingers.  Using a fine grater, grate the chocolate bar to cover the mascarpone (as little or as much as you like).  Repeat with a second layer of dipped ladyfingers and the remaining mascarpone filling. Finish off the Tiramisu by grating more chocolate over the top to cover.

Chill for at least 6 hours before serving.

Variations – Can make in trifle bowl and make three layers instead of 2.  Can grate a mixture of white chocolate and dark chocolate between each layer.  Can use a dusting of cocoa powder on Tiramisu instead of grating the chocolate.

Wednesday, December 14, 2011

Cranberry White Chocolate Biscotti


With the exception of my Chocolate Chip Cookie recipe I would have to say that my Biscotti are my most requested cookies.  Biscotti are the best because you can make them and they will stay hard and crunchy for weeks.  I wouldn't know about that myself because these never make it more than a day in my house.  They disappear to friends and family before I get a chance to taste them most times.  This is my favorite biscotti recipe, it is really great as a holiday cookie but you can change the flavors and make them any time of the year.  My boys love it when I put chocolate chips in them and drizzle them with a rich bittersweet chocolate!


Some people think that Biscotti are difficult to make but these are super easy!  The dough doesn't need to rest in the refrigerator for hours like some recipes, it is ready to bake right away.


The only real trick is to let the logs cool down to room temperature before slicing them.  This prevents the cookies from falling apart.  ENJOY!


Cranberry White Chocolate Biscotti

2 ½ cups flour
1 teaspoon baking powder
½ teaspoon salt
½ cup butter
1 ½ cups sugar
2 large eggs
½ teaspoon almond extract
½ cup dried cranberries

Quality white chocolate for melting

Preheat oven to 350. Line baking sheet with parchment paper.  Combine dry ingredients in medium bowl; whisk to blend.  Using electric mixer, beat sugar, butter, eggs, almond extract in bowl until well blended.  Mix in flour mixture, then dried cranberries.

Divide dough in half. Using floured hands, shape each piece into 2 ½ in. wide, 9 ½ in. long, 1 inch high logs.  Transfer to baking sheet.

Bake logs until golden brown (logs will spread), about 30 minutes.  Cool completely on sheet on rack. Maintain oven temperature.  Transfer logs to cutting board, discard parchment paper.  Using a serrated knife, cut logs on diagonal into ½ inch wide slices (I make mine a little thicker).  Arrange slices, cut side down on baking sheet.  Bake 10 minutes; turn biscotti over.  Bake another 5 minutes, or until just begin to color.  Transfer to rack to cool.

Melt white chocolate and drizzle over biscotti or dip biscotti into chocolate!

Can make biscotti days in advance but don’t drizzle chocolate until the day you plan to serve them.

Tuesday, December 13, 2011

Chocolate Cheesecake Bars!


What to make for my very first blog?  I have many recipes that I know are wonderful and that I get requests for but of course I have to do things the difficult way and make a brand new recipe that I've never tried!  I needed to make an easy dessert to go along with a dinner meeting I catered tonight and when I saw this recipe for Chocolate Cheesecake Bars I knew I found a winner.   I love cheesecake, it is one of my all time favorite desserts.  I love it for it's creamy texture, rich filling, and fabulous graham cracker crust.  The only thing that would make cheesecake even better would be to make it with chocolate!  So that's what I did, this recipe is chocolate crust with chocolate filling topped with a rich chocolate glaze!


This is an easy recipe to make.  The only problem I had was with finding the chocolate cookies to make the crust.  I ended up substituting graham cracker crumbs mixed with Dutch processed cocoa powder.  You could not tell the difference, the crust was still fabulous!  I posted pictures of the finished product on fb and got rave reviews so I knew this had to be my first recipe post.  I hope you all enjoy the recipe!

Recipe adapted from Foodnetwork:


Chocolate Cheesecake Bars

Crust:
20 chocolate wafer cookies
3 tablespoons unsalted butter, melted
1 tablespoon sugar
1/2 teaspoon instant espresso

Filling:
8 ounces semisweet chocolate, finely chopped
8 ounces cream cheese, room temperature
2/3 cup sugar
1/2 cup sour cream
2 large eggs, room temperature

Glaze:
4 ounces bittersweet chocolate, chopped
2 tablespoons unsalted butter
1 teaspoon light or dark corn syrup
2 tablespoons sour cream, room temperature

Preheat oven to 350 degrees F. Line an 8-inch square baking dish with foil.
For the crust: Process the chocolate wafers in a food processor with the butter, sugar and espresso until fine. Evenly press the crust into the prepared dish covering the bottom completely. Bake until the crust sets, about 15 minutes.
Meanwhile, make the filling: Put the chocolate in a double boiler set over a slow simmer and stir until melted and smooth.
Blend the cream cheese, sugar, and sour cream together in the food processor until smooth. Scrape down the sides, as needed. Add the eggs and pulse until just incorporated. With the food processor running, pour the chocolate into the wet ingredients and mix until smooth.
Pour the filling evenly over the crust. Bake until filling puffs slightly around the edges, but is still a bit wobbly in the center, about 25 to 30 minutes. Cool on a rack.
For the Glaze: Put the chocolate, butter and corn syrup in microwave safe bowl. Heat glaze in the microwave at 75 percent power until melted, about 2 minutes. Stir the ingredients together until smooth; add the sour cream. Spread glaze evenly over the warm cake and refrigerate for at least 3 hours but preferably overnight.  Cut into small bars or squares. Serve chilled or room temperature.
Makes 16 servings.