Showing posts with label Cakes. Show all posts

Thursday, July 18, 2013

Chocolate Chocolate Cake!


Recently, my sweet little baby boy had a birthday!  He turned 17......17?!?  I know.....I'm much too young to have a 17 year old! I must have had him when I was 10 years old...right?! Come on.....humor me, I love living with my grand illusions!  ;)


Between the 17 year old, the 14 year old and the dog....my house is never boring and it's never quiet but there are always willing food testers!  Being the chocolate cake fanatic that he is, Zack chose this recipe for his birthday.  Ina Garten's chocolate cake from her cookbook "Barefoot Contessa at Home".


This is a super easy and delicious recipe!  I love Ina's recipes so I followed this one, only making the change of taking out the espresso from the frosting.  I thought that the coffee in the cake was good but in the frosting would be overkill.  It's a pretty rich frosting so I think I made the right call.  The entire cake was gone in one sitting....pretty sure this means they LOVED it!


Happy Baking!!  :)

CHOCOLATE CHOCOLATE CAKE! adapted from Barefoot Contessa at Home

1 3/4 cups all-purpose flour, plus more for pans
2 cups sugar
3/4 cups good cocoa powder
2 teaspoons baking soda
1 teaspoon baking powder
1 teaspoon kosher salt
1 cup buttermilk, shaken
1/2 cup vegetable oil
2 extra-large eggs, at room temperature
1 teaspoon pure vanilla extract
1 cup freshly brewed hot coffee

Preheat the oven to 350 degrees F. Spray 2 8" round baking pans with non-stick spray, then line the bottom of the pans with parchment rounds and spray the parchment paper.

Sift the flour, sugar, cocoa, baking soda, baking powder, and salt into the bowl of an electric mixer fitted with a paddle attachment and mix on low speed until combined. In another bowl, combine the buttermilk, oil, eggs, and vanilla. With the mixer on low speed, slowly add the wet ingredients to the dry. With mixer still on low, add the coffee and stir just to combine, scraping the bottom of the bowl with a rubber spatula. Pour the batter into the prepared pans and bake for 35 to 40 minutes, until a cake tester comes out clean. Cool in the pans for 30 minutes, then turn them out onto a cooling rack and cool completely.

Place 1 layer, flat side up, on a flat plate or cake pedestal. With a knife or offset spatula, spread the top with frosting. Place the second layer on top, rounded side up, and spread the frosting evenly on the top and sides of the cake.

Chocolate Frosting:
6 ounces good semisweet chocolate
1/2 pound (2 sticks) butter, at room temperature
1 extra-large egg yolk, at room temperature
1 teaspoon pure vanilla extract
1 1/4 cups sifted confectioners' sugar

Chop the chocolate and place it in a heat-proof bowl set over a pan of simmering water. Stir until just melted and set aside until cooled to room temperature.

In the bowl of an electric mixer fitted with a paddle attachment, beat the butter on medium-high speed until light yellow and fluffy, about 3 minutes. Add the egg yolk and vanilla and continue beating for 3 minutes. Turn the mixer to low, gradually add the confectioners' sugar, then beat at medium speed, scraping down the bowl as necessary, until smooth and creamy. On low speed, add the chocolate to the butter mixture and mix until blended.  Spread immediately on the cooled cake.

Recipe shared on:
Chocolate, Chocolate, and more - Thursday's Treasures
Wednesday's Adorned From Above Blog Hop
Rediscovering Lost Arts From Our Mothers - Tried and True Recipes
Foodie Friends Friday
Esskunst - CakeFriday Coffee Klatch Linky Party

Thursday, February 21, 2013

Frozen Cappuccino Crunch Cake


Been crazy busy with work and school and homework lately and I haven't posted in ages!!  So, here is a post...short but sweet!  My oldest son found this recipe and decided we had to make it for Valentine's Day for dessert.  It goes together easily (but takes a while with all of the freezing necessary) and is delicious!  

Better than any ice cream cake from Baskin Robbins!!!!  Oh darn...don't tell them I said that....I doooo LOVE Baskin Robbins!  :)


Frozen Cappuccino Crunch Cake Adapted from Nestle Toll House


1 (10 3/4 oz.) frozen pound cake, thawed
3/4 cup heavy whipping cream
1 3/4 cups dark chocolate, chopped
4 cups (1 quart) coffee ice cream, softened
1 cup frozen whipped topping, thawed
1 3/4 cups coarsely crushed malted milk balls
Frozen whipped topping, thawed (optional)
Coarsely crushed malted milk balls, (optional)

Directions:

SLICE pound cake into 1/8- to 1/4-inch slices. Place half of the slices on bottom of 9-inch springform pan; press down firmly. Set remaining slices aside.

BRING cream just to a boil in medium saucepan. Remove from heat. Add chocolate; let stand 5 minutes. Whisk until well combined and smooth. Pour half of the chocolate mixture over pound cake in pan, spreading evenly to within 1/4-inch of edge of pan. Cover; freeze for 1 1/2 hours or until chocolate is set.

COMBINE softened ice cream and whipped topping in large bowl. Fold in 1 3/4 cups crushed malted milk balls. Spread over chocolate layer in pan. Cover; freeze until ice cream is firm, about 2 hours.

TOP ice cream with remaining pound cake slices; press down firmly. Spread remaining chocolate mixture over pound cake. Cover; freeze at least 6 hours.

Enjoy!

Recipe shared on:
Wednesday's Adorned From Above Blog Hop
21st Century Housewife - The Hearth and Soul Hop
Chocolate, Chocolate, and More - Thurdsay's Treasures
Foodie Friends Friday
Rediscovering Lost Arts From Our Mothers

Tuesday, June 26, 2012

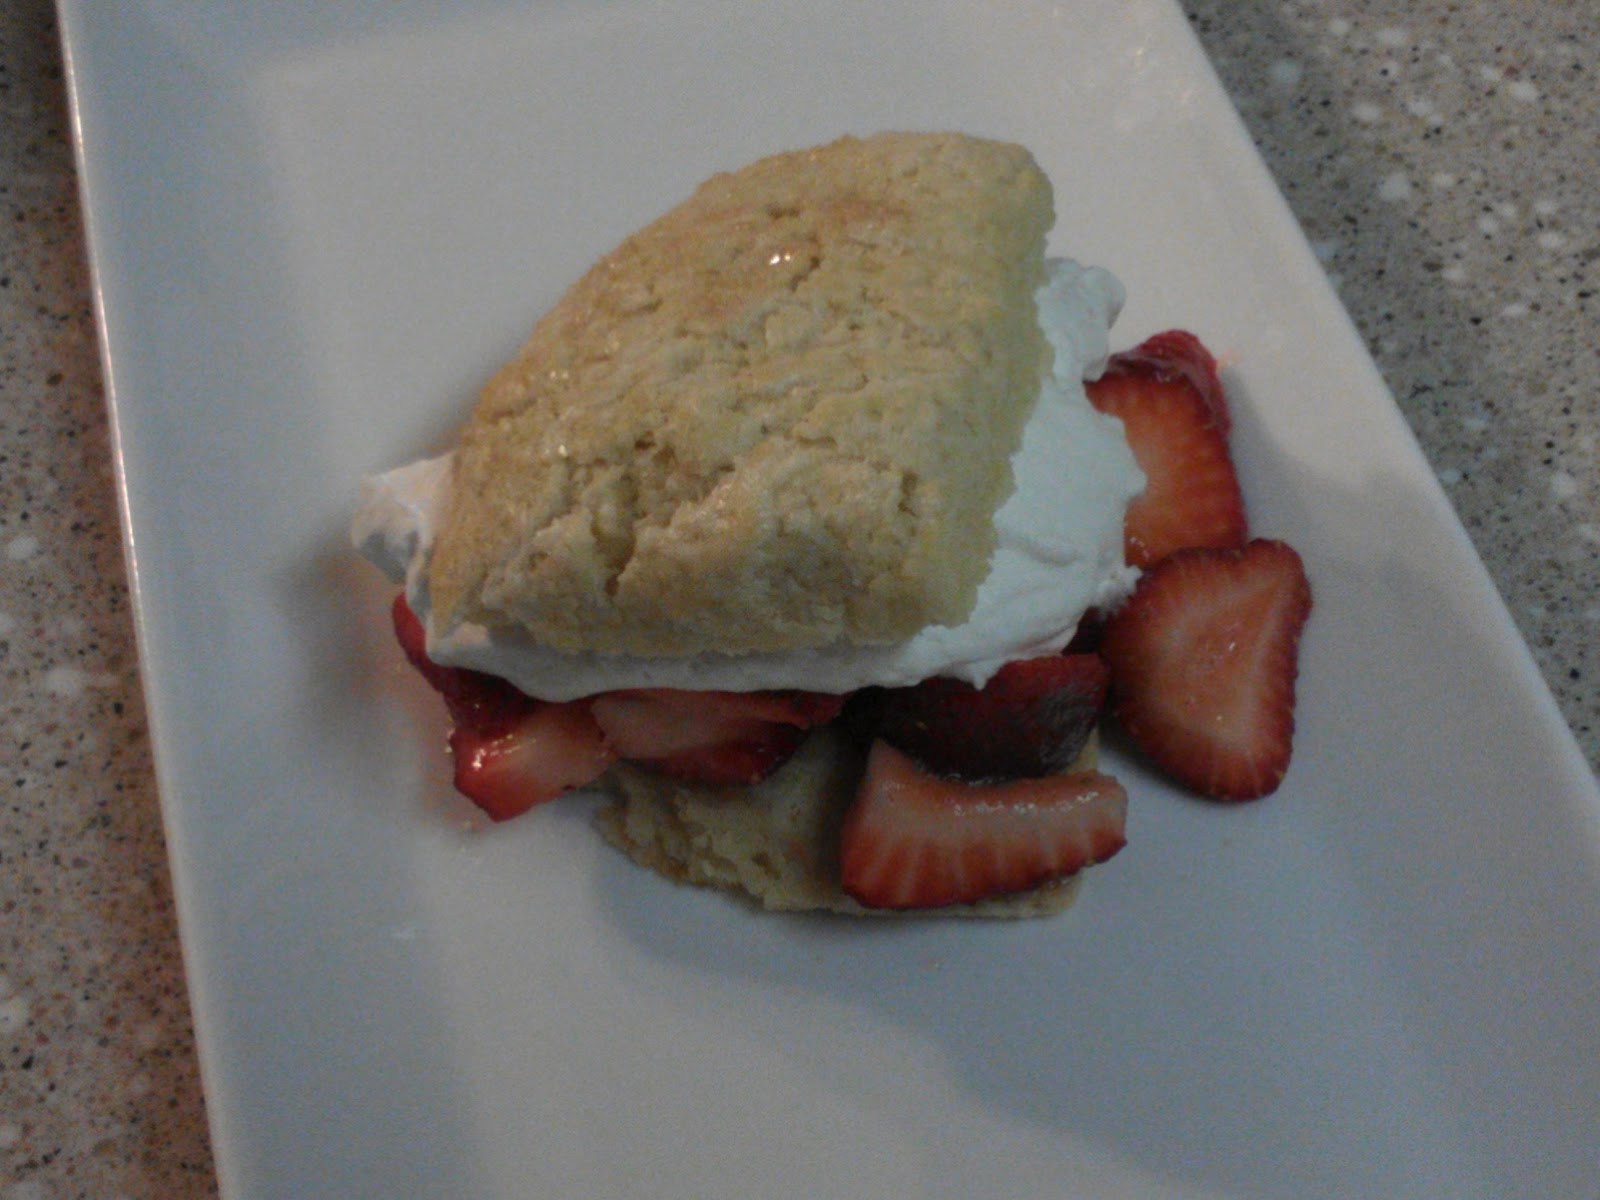
Strawberry Shortcake


To me summer means warm days, swimming pools, BBQs, 4th of July fireworks, and lots of wonderful, sweet fruit!  Especially STRAWBERRIES!!  With 4th of July coming upon us soon I have been looking through my recipes for some great ideas and I thought, what could be better than yummy Strawberry Shortcake!  This was one of my favorite desserts growing up!  My Mom made it every summer and I can still remember those sweet juicy strawberries!  


Strawberry Shortcake is a very straightforward and simple dessert but there are always ways to modify it to your liking.  You can make a sweet cream scone, a biscuit, angel food cake or even pound cake for your base.  I chose to make a sweet cream scone, I like that it is solid enough to hold up to all of the berry juice without falling apart.  I love the recipe from Joy of Baking (here) and followed their instructions almost exactly, with a couple of minor changes. In my instructions below I said to cut into rounds but if you are like me and you hate to waste any of the dough, feel free to form the dough into a big square and cut the scones into squares as well. That way there is no waste!  :)


I used strawberries that were pretty juicy and sweet on their own and I just crushed about 1/3 of them with my potato masher before adding them to the rest of the sliced strawberries and sugar.  If you let this sit out for a while, it will become syrupy and juicy and super yummy.  Feel free to add any other berries that you like as well.  I love to do a mix of raspberries and blueberries with the strawberries!


If you are super busy, like me, and you like to whip the cream ahead of time, use the tip that I got from Joy of Baking....  pour cream, sugar and vanilla into your mixing bowl together and place in refrigerator for 15-30 minutes before whipping.  If you do this, your whipped cream will hold for a few hours in the refrigerator without deflating and becoming runny.  I'm not sure why it works, but it does!  Every time!!  


I hope you all have a great summer filled with lots of BBQs, picnics, swim parties and LOTS of great food!!


This recipe featured on:

Strawberry Shortcake

Cream Scone:
2 cups all-purpose flour
1/4 cup granulated white sugar
2 teaspoons baking powder
1/4 teaspoon salt
1/3 cup cold unsalted butter
1 large egg
1 teaspoon pure vanilla extract
1/2 cup cream, half and half, or milk
Preheat oven to 375 degrees F (190 degrees C) and place rack in middle of oven.  Line a cookie sheet with parchment paper. 

In a large bowl, whisk together the flour, sugar, baking powder, and salt. Cut the butter into small pieces and blend into the flour mixture with a pastry blender or two knives. The mixture should look like coarse crumbs.  Whisk together the egg, cream and vanilla extract and add to the flour mixture, mixing just until the dough comes together. Do not over mix the dough.

Transfer to a lightly floured surface and knead dough gently four or five times and then pat or roll the dough into a 7 inch (18 cm) round. With a 3 inch (7 cm) round cookie cutter, cut out rounds and place the scones on the baking sheet. Brush the tops of the scones with a little cream and sprinkle the top with course sugar. Bake for about 15 - 20 minutes or until nicely browned and a toothpick inserted in the center of a scone comes out clean. Transfer to a wire rack.

Filling:
2 pounds fresh strawberries (cleaned and sliced)
1/4 cup - 1/3 cup granulated white sugar (or to taste)
Place strawberries in a bowl and sprinkle with the sugar. (The amount of sugar used will depend on how sweet the berries are.)  I like to mash about 1/3 of the strawberries a bit and mix them in with the rest of the sliced strawberries. Set aside to macerate at room temperature for about 30 to 60 minutes.


Whipped Cream:

1 cup cold heavy whipping cream 
1 tablespoons granulated white sugar 
1 teaspoon vanilla extract
Chill the mixing bowl in the freezer for 15 minutes before whipping the cream.   Place the cream, sugar and vanilla in the bowl and whip until stiff peaks form. The whipped cream can be covered and stored in the refrigerator for a few hours.

Assemble:
Cut the scones in half and place the bottom half of the scone (soft side up) on a dessert plate. Top with some of the strawberries and whipped cream. Place the top half of the scone on the strawberries. Top with whipped cream and a few more strawberries. If there is any juice from the strawberries, drizzle a little over the top of the scone. Serve immediately.


ENJOY!!!


Thursday, June 21, 2012

Rainbow Cupcakes

UPDATE: Ok, I have made these several times now and I can honestly say....FOOLPROOF!!  The only changes I have made is to the brightness of the colors based on the request of the client.  I LOVE this recipe and so does everyone who tries them.  I made them for my Birthday Party the other day and had pictures taken of the most recent batch.  The pictures turned out great and I had to share my favorite:


First of all.....I cannot even begin to tell you how much fun this was!!!  I was able to talk two teenage boys into mixing, coloring, stirring, layering, and baking these bad boys.  And....they did it willingly!!  They probably even enjoyed it!


Today we planned to visit my brother and sister-in-law and their family (including my grand-nieces and nephew).  When going to someone's house to visit, you should always take a treat.  You don't want to show up empty handed.  I thought my two adorable nieces would really LOVE these cupcakes with all of their bright colors and the gooey, yummy seven minute frosting!  Besides, it is the prerogative of the Aunt (or Grandmother) to feed copious amounts of sugar to all young family members who don't live with them!  It is tons of fun to feed someone else's kids sugar and then leave once you have them bouncing off the walls!  :)


I do not have a recipe for you today, more of a technique for Rainbow Cupcakes:

Step 1 - Take your favorite white cake recipe (mine is Martha Stewarts) or your favorite white cake mix.

Step 2 - Separate your batter into 5 bowls (more or less, depending upon how many colors you would like to use).


Step 3 - Add food coloring to each of the bowls (I use gel colors and make them super bright)


Step 4 - Spoon a layer of your first color into the bottoms of the cupcake liners, you can spread the layers out with a spoon if you prefer or do as I have and leave the spoonful where it lands.  I like the fun look of the colors swirling around.

Step 5 - Repeat layering with each of the colors and then bake as recipe directs.


Step 6 - Allow cupcakes to cool and then frost as desired.  I used my famous Seven Minute Frosting recipe which tastes just like homemade marshmallow frosting !


This post featured on:


Seven Minute Frosting

1 ½ cups sugar
¼ teaspoon cream of tartar
1/8 teaspoon salt
1/3 cup water
2 egg whites
1 ½ teaspoons vanilla extract

Place all ingredients, except vanilla, in top of a double boiler.  Place pan over boiling water, being sure that boiling water does not touch the bottom of the top pan.  Beat constantly on high speed with electric mixer for 7 minutes.  Remove from heat and beat in vanilla.

Enjoy!!!

Tuesday, June 19, 2012

Baked Donuts with Chocolate Glaze


Summer break is here, school is out, teenagers are running wildly through my house, shooting dart guns, hiding each other's things and holding them ransom, making messes and eating every scrap of food in sight!  There are always stray kids spending the night and they all stay up super late, watching inappropriate TV and making tons of noise!  Basically, I haven't laughed this much in years and I am sleep deprived!

When you have sleepovers at your house there are certain expectations....pizza for dinner, soda, dessert and donuts for breakfast!  Since I am not made of money and I cannot seem to get my money tree to grow in the garden, I am forced to improvise!  Last night was homemade pizza (see my post from January called "Sleepovers and Homemade Pizza") which is much healthier, super easy, and INEXPENSIVE!!!  For breakfast I decided it was time to pull out the Wilton donut pans and try baked donuts!  

I got the pans as a gift a while back and there they sat....in the box....in the garage.  I thought the idea of baking homemade donuts was nuts.  Too much work, too much time and there was no way they would be good.  WRONG!!!  

I can't believe how easy they were to make!  Took 10 minutes to put the batter together and 8 minutes to bake them and dip them in a chocolate glaze.  It actually took the kids longer to eat them all than it took me to make them!

Everywhere I look lately I see people blogging about their baked cake donuts.  I figured it was about time I see what the fuss is all about.  I searched around and found that most people were using an adapted version of the recipe Wilton includes with the donut pans.  I particularly liked the sound of the recipe on Cook Au Vin, as she stated that her recipe was lighter and fluffier and less dense than most other recipes.  


I followed her recipe pretty much exact except that I doubled it and excluded the cocoa, making mine a vanilla donut (as was requested by the boys).  I did not use her glaze but chose a recipe that Alton Brown used on his show when he made donuts.  The glaze reminds me of the chocolate glaze on the raised donuts at a shop here in town!  YUMM!


I hope you all try them!  Don't be afraid!  Just get your donut pans out of the garage (or head to the store to buy some) and start baking!  Next time I'm making Chocolate with Chocolate glaze and toffee bits!!!


Baked Donuts with Chocolate Glaze Adapted from Cook Au Vin

2 cups cake flour (can use all-purpose if need)
1 teaspoon baking powder
1/2 teaspoon salt
3/4 cup granulated sugar
2 large eggs, lightly beaten
3/4 cup buttermilk
4 tablespoons unsalted butter, melted and cooled
1 1/2 teaspoons distilled white vinegar
1 teaspoon baking soda
2 teaspoon vanilla extract

Preaheat oven to 375 degrees.   Spray donut pan with cooking spray.

Into a medium bowl, sift the flour, sugar, baking powder and salt.  Add the buttermilk and egg and combine.   Stir in the butter.   In a small bowl, combine the baking soda and vinegar, then add vanilla.  Add this mixture to the donut batter and combine.

Put the batter into a ziplock bag and snip a hole on the end.  Squeeze the dough into the donut pans, only filling each about half way.  They will rise considerably while baking and the hole will close up if you fill them too much.   Bake for 8 minutes.  Allow to cool for a few minutes before moving them to a cooling rack.   Wipe the pan out, spray with cooking spray again, and bake the remainder of the dough.


Chocolate Glaze Adapted from Alton Brown at Foodnetwork
2 cups confectioners’ sugar, sifted
1/2 cup unsalted butter
1/4 cup whole milk, warmed
1 tablespoon light corn syrup
2 teaspoons pure vanilla extract
4 ounces bittersweet chocolate, chopped

Combine butter, milk, corn syrup, and vanilla in a medium saucepan and heat over medium heat until butter is melted.  Decrease the heat to low, add the chocolate, and whisk until melted.  Turn off heat, add the confectioners’ sugar, and whisk until smooth.

Dip the cooled donuts into the glaze and place back on the rack to set.

ENJOY!!

Sunday, April 1, 2012

Honeyed Apple Torte


I have had two children and I LOVE to bake and cook (and eat!) so on many occasions I have wanted to watch my weight and eat lighter.  Since I am morally opposed to the word "DIET" (the worst four letter word there is) I typically just try to eat healthier and exercise more.  One of my favorite places to turn for lighter recipes is the magazine "Cooking Light".  This is NOT a cookbook of diet food but rather gourmet recipes with a lot of flavor and less fat and calories.  Way back in 1999 after my youngest son, Max, was born I found this recipe for Honeyed Apple Torte.  Sooooo YUMMY!  The apples are caramelized a bit in honey and lemon juice and then arranged in this very simple cake batter.  It looks really cool after it has baked and it tastes delish.  I am a bit of a freak for any dessert with apples and this one is too good to pass up.


I am not selling it as a "healthy" dessert.....just as a dessert that is full of tender caramel apple flavor and a hint of cinnamon.  You can even top it with a scoop of vanilla ice cream if it makes you feel better!  I am going to sneak into the kitchen for another slice before it's all gone!  :)

Honeyed Apple Torte
Serves 10

1/3 cup honey
2 tablespoons fresh lemon juice
3 Granny Smith apples, peeled and each cut into 8 wedges (about 1 1/4 pounds) 
3/4 cup granulated sugar 
6 tablespoons butter or stick margarine, softened 
1/4 cup packed brown sugar
1 teaspoon vanilla extract
2 large eggs
1 teaspoon grated lemon rind
1 cup all-purpose flour
1 teaspoon baking powder
1/4 teaspoon salt
Cooking spray
1 tablespoon granulated sugar 
1/2 teaspoon ground cinnamon

Preheat oven to 350°.
Combine honey and lemon juice in a large nonstick skillet; bring to a simmer over medium heat. Add apples; cook 14 minutes or until almost tender, stirring frequently. Remove from heat; set aside.

Beat 3/4 cup granulated sugar, butter, brown sugar, and vanilla at medium speed of a mixer until well-blended (about 4 minutes). Add the eggs, 1 at a time, beating well after each addition. Beat in lemon rind. Lightly spoon flour into a dry measuring cup, and level with a knife. Combine the flour, baking powder, and salt, stirring well with a whisk. Gradually add flour mixture to sugar mixture, beating at low speed until blended. Pour batter into a 9-inch springform pan coated with cooking spray.

Remove apples from skillet with a slotted spoon; discard remaining liquid. Arrange apple slices spoke-like on top of batter, pressing slices gently into batter. Combine 1 tablespoon granulated sugar and cinnamon; sprinkle evenly over apples. Bake at 350° for 30 minutes or until cake springs back when touched lightly in center. Cool in pan on a wire rack. Cut into wedges using a serrated knife.

Cooking Light-SEPTEMBER 1999