Monday, February 13, 2012

My Buttermilk Dilemma - Solution: Buttermilk Chocolate Cookies!


All of my favorite blogs and cooking websites seem to be focusing on Valentines Day and chocolate recipes.  I see all of these recipes and I am so inspired to bake with chocolate but I have this buttermilk dilemma.  I bought half a gallon of buttermilk for a recipe that only required one cup and I have spent hours trying to find new ways to use it up.  I have made the usual suspects, buttermilk biscuits and buttermilk pancakes, but I seriously just want to start baking up some chocolate!!!  I know, I know, I know....I could just throw it out and focus on chocolate but anyone who knows me knows this is not possible (too frugal).  So, I searched for chocolate recipes that use buttermilk and found a recipe for Buttermilk Chocolate Cookies that Goddess of Baking posted to solve her buttermilk problems and they looked fabulous.  


These cookies are VERY rich and chocolaty!  I followed the recipe as written except that I used Dutch processed cocoa instead of regular cocoa and dark chocolate instead of semi-sweet chocolate chips.  This made my cookies even richer!  They are fabulous with their crunchy exterior and gooey, chocolaty interior!  Perfect for all of you chocolate addicts out there!

Enjoy!


BUTTERMILK CHOCOLATE COOKIES

2 Cups Flour
1/2 Teaspoon Baking Soda
1/2 Teaspoon Salt
1/2 Cup or 1 Stick Butter, unsalted and melted
3/4 Cup Dutch Cocoa Powder
2 Cups Sugar
1 Teaspoon Vanilla
2/3 Cup Buttermilk
2 Cups Semisweet or Dark Chocolate, chopped

Preheat oven to 350 degrees.

In a medium bowl, combine the flour, baking soda, and salt.

In the bowl of your kitchen aid with the whisk attachment, combine the cocoa powder and melted butter until smooth. Add in the sugar, vanilla, and buttermilk.

Slowly add in the flour mixture and mix until just combined. Stir in the chocolate.

Scoop the dough onto the lined baking sheets about 1 1/2 inches apart. Bake for 10-12 minutes.

Cool the cookies on the baking sheet for a couple of minutes before transferring to a wire rack to cool more.

Adapted from Goddess of Baking

Thursday, February 9, 2012

Red Wine and Zucchini Bread...It's What's For Dinner!


When I was growing up, my Mom made everything from scratch.  Meals were all home cooked and all full of fresh and wonderful ingredients.  What Mom always loved best were the vegetables and I have certainly inherited that.  There are many nights when I eat nothing but veggies for dinner!  Steamed, sauteed, roasted, grilled....it doesn't matter how you fix them, I love them.   Last night I planned a very healthy and yummy dinner of grilled veggies!  I had my zucchini, red bell peppers, onion and portobello mushrooms ready to go.  What a nice, healthy, refreshing dinner.  Ah, the best laid plans....

Yesterday was not the greatest of days.  My morning went well and I was productive with work, but the afternoon turned "blah".  That's the best way to describe it, blah.  Suddenly vegetables for dinner didn't sound so great, really not comfort food at all.  Now, I have all of these veggies and I really should eat vegetables for dinner still so I went through my recipes and came up with something that I think is a perfect alternative: Zucchini Bread!  Um, seriously, zucchini is a vegetable.  This is still a healthy dinner, right?  What's not healthy about zucchini mixed with some eggs, a little flour, a little oil, maybe a smidge of sugar.  I really don't see the problem!  

The only problem I had was this....which wine do you serve with zucchini bread?  Red or white?  Personally, I think red goes with any meal.  Problem solved!

I hope you find this bread to be just as delicious as I did.  You do not have to eat it for dinner, it is fine as breakfast, dessert or even a snack.  Don't feel you are limited to red wine either, feel free to enjoy your bread with a nice white wine, beer or even coffee if you insist.

Cheers!


Zucchini Bread

3 cups all-purpose flour
1 teaspoon salt
1 teaspoon baking soda
1 teaspoon baking powder
3 teaspoons ground cinnamon
3 eggs
1 cup vegetable oil
1 3/4 cups white sugar
3 teaspoons vanilla extract
2 cups grated zucchini
1 cup chopped walnuts

Grease and flour two 8 x 4 inch pans. Preheat oven to 325 degrees F.

Sift flour, salt, baking powder, soda, and cinnamon together in a bowl, set aside.

Beat eggs, oil, vanilla, and sugar together in a large bowl. Add sifted ingredients to the creamed mixture, and beat well. Stir in zucchini and nuts until well combined. Pour batter into prepared pans.

Bake for 50 to 60 minutes, or until tester inserted in the center comes out clean. Cool in pan on rack for 20 minutes. Remove bread from pan, and completely cool.


Recipe adapted from allrecipes.com


Tuesday, February 7, 2012

Homemade Twix Bars

(photo by my very talented friend Steev)

I don't eat a lot of candy.  Give me a nice dark chocolate bar from Europe or some chocolate covered almonds, occasionally I will even eat a Reese's Peanut Butter Cup or a Twix bar.  Lately I have seen many people blog about making homemade candy bars.  Homemade Reese's, Snickers, Mounds, Butterfinger and many, many postings of homemade Twix.  A Twix bar is basically a layer of shortbread cookie with a layer of caramel that is covered completely in milk chocolate.  Not your typical candy bar and I was pretty sure it would be more like a cookie if it were homemade.  I love trying new cookies and that is how I approached this task, as though I were trying a new cookie recipe.  I love shortbread, I love caramel, and I love chocolate!  Basically, even if it doesn't taste like a Twix bar, it is bound to be delicious with all of those components!


First task....find a recipe.  After reading through several, I decided to try the recipe from instructables.com.  The recipe was easy to follow and there were a lot of pictures to guide me.  I liked the shortbread cookie recipe but I will probably try my regular recipe next time I make these, only because I think the shortbread should be crunchier and these cookies were a little on the soft side.


The only other issue was how to deal with the chocolate.  Should I dip the entire cookie in chocolate so that it is just like a Twix bar or should I drizzle chocolate over the top?  I really couldn't decide and ended up doing half dipped and half drizzled.  I think they looked fabulous drizzled!  Plus....it was easier than dipping each of them.  However, all of the dipped cookies held their shape and were easy to store and transfer, while all of the drizzled cookies were oozing with caramel.  As they sat a bit, the caramel slid down the sides of the cookies.  They still look great but are a little messier to handle.  You choose which way you would like to make yours, I will probably still go with the drizzle!


Homemade Twix Bars

Shortbread Crust:
1 cup  butter, room temperature
1/2 cup sugar
2 cups all purpose flour
1/4 teaspoon baking powder
1/2 teaspoon salt
1/2 teaspoon vanilla extract
2 tablespoons (1oz) milk

Preheat oven to 325 degrees F.  Cover baking sheet in parchment paper and set aside.

Cream butter and sugar together until fluffy.  In a separate bowl, mix flour, baking powder and salt.  Over slow speed, add flour mixture to butter mixture just until blended.  Mix in vanilla and milk.  Wrap dough in plastic wrap and refrigerate for 30 minutes.  

Roll dough directly on parchment paper  and bake until edges become golden and cookie is set, about 20-25 minutes.  Set aside to cool

Caramel Layer:
14-15 ounce bag of soft caramels
2 tablespoons cream

In a small saucepan, melt caramels with cream over low heat.  Stir often until smooth.  Spread evenly over cooled shortbread crust.  Let caramel set completely.  When it has set, cut into desired shapes.  I cut mine into 1” by 2 ½” bars.

Chocolate Layer:
12 ounces milk or dark chocolate , chopped
1 teaspoon shortening

Place chocolate and shortening in microwave safe bowl and melt over 50% power, stirring ever 30 seconds until chocolate is melted.  Dip bars in chocolate and place on wax paper to set or drizzle chocolate over each of the bars and allow to set.

Enjoy!!  ;-)

Friday, February 3, 2012

Super Bowl Football Cakepops!


My son, Zack, is a huge Patriots fan and I wanted to surprise him with Football Cake Pops to enjoy during Super Bowl this weekend.   I just learned how to make cake balls and cake pops last weekend when the kids and I were visiting my brother and nieces in Arizona.  They were so much fun to make and even more fun to eat!  I do not have an actual recipe for the pops but I can tell you how I made them and give you some tips that helped me!


Pick any flavor of cake mix you like and prepare it according to the directions on the box.  When the cake is still warm crumble it into a bowl and add a tub of your favorite frosting flavor (mix and match any flavors you like, I chose white cake with white frosting).  Mix the cake and frosting until it is completely smooth, then stick this mixture into the refrigerator for about an hour to make the cake mixture easier to work with.  Roll the mixture into balls or desired shape and place onto parchment lined baking sheets and stick back in the refrigerator.  I found these balls much easier to work with if they were really cold.  


I went to our local craft store and picked up candy sticks and candy coating.  They have tons of  different colors of candy coating to chose from.  I chose dark chocolate for the footballs but I picked up some fun colors for another time (I'm thinking pink cake pops for Valentine's Day)!  I also picked up a tube of white decorator gel to make the strings on the footballs.  Melt a small amount of the candy coating and dip the stick into it about 1/2" deep, then stick into a cake ball and stick back in the refrigerator for 30 minutes or so.  This will glue the ball to the stick so it doesn't slide off of the stick.  Melt your candy coating in small batches, I melted mine in a coffee mug in the microwave.  Dip football pops into candy coating and let excess drip off into the mug.  When the cake pop stops dripping you can stick them into Styrofoam to dry, this is a great way to store the cake pops as well.  Once completely dry, decorate as desired and enjoy!  I stored my cake pops in the refrigerator but I imagine you can store them at room temp as well.


Enjoy these yummy and adorable little footballs!!  Below are some pictures of my nieces teaching me how to make cake balls last weekend!  We had so much fun baking together and making a mess in the kitchen, even more fun was eating our yummy treats.  Cake balls and cake pops are a great project for the family!


The Liebster Blog Award


I was very excited last night to receive a message on my blog from a fellow blogger.  Deb, from Gingerbread Men, awarded me the Liebster Blog Award!  The Liebster Blog Award really captures what I’ve experienced with the food blogging community – support, encouragement and above all appreciation. Liebster is a German word meaning dearest, beloved, or favorite, thus the award means “Dearest Blog”. It is given to people whose blogs have less than 200 followers. I have found blogging to be a lot of fun but it is also a lot of hard work. This award is a way for a blogger to say "Welcome to the club, you are doing a great job!"  I am honored that Deb thought me deserving of this award!  Thanks Deb!!


To accept the award you have to do the following:
Thank the person who awarded you on your blog. 
Link back to the person who awarded you. 
Select 5 top picks for the award.
Inform your top 5 by leaving a comment on their blog.
Post the Award on your blog.


I’m passing this award onto 5 amazing bloggers, it is really difficult to pick just 5 because I have many blogs that I absolutely love reading everyday!  Please check out their blogs and enjoy!!


Gina at http://www.spcookiequeen.com/
Jess at http://www.onsugarmountain.com/
Julia at http://mustcomehungry.wordpress.com/
Shelly at http://inthelandofspice.com/
Lisa at http://blog.markgregoryandcompany.com/


Thursday, February 2, 2012

Greek Macaroni and Cheese


There is a fabulous restaurant in my area called "Homeroom" that specializes in a menu of Mac and Cheese!  They have the greatest mac and cheese combos like "Trailer Mac" with hot dogs and potato chip topping, "Mexican Mac" with chorizo and peppers, "Mac the Goat" with tangy fresh chevre, "The Exchange Student" which is Greek-style with artichoke hearts and spinach, and many, many more!   They also have great soups, salads and yummy homemade desserts, even homemade oreos!!  Each time I go I am inspired to try to make these delicious cheesy dishes at home.  My favorite thing to order is "The Exchange Student", I love feta cheese and I love artichoke hearts and spinach!  Last night I decided to try and re-create this dish.  Not so easy since I don't know what they actually put into it or what type of cheese is used in the bechamel.  I know that it doesn't look or taste like there is any cheddar in at all.  


I made a bechamel, which is a white sauce made by whisking warm milk into a roux of butter and flour.  Once that thickened I added gruyere and parmesan cheeses, salt and pepper and some spices for a little kick.  In a a saute pan I carmelized shallots and then added the chopped artichoke hearts and spinach.  Mix it all together and top with feta and buttered bread crumbs and you have a wicked yummy meal!!!  I'm not sure if it's even close to the same as Homeroom's recipe but it is just as good (if not better)!  The vegetables add great flavor and the cheese sauce is yummy and gooey!  I love this recipe and I hope you do too!  

ENJOY!!

Greek Macaroni and Cheese

1 pound large elbow macaroni
8 tablespoons butter, plus more for casserole dish
5 cups milk
1/2 cup all-purpose flour
1 teaspoon salt
1/2 teaspoon ground pepper
1/4 teaspoon grated nutmeg
1/4 teaspoon cayenne pepper 
4 cups grated Gruyere cheese
1 cup grated Parmesan cheese
1 cup crumbled feta cheese
2 large shallots sliced
1/2 cup chopped artichoke hearts (drained, not marinated)
2 cups chopped fresh spinach
1/2 dried bread crumbs or panko bread crumbs

Heat oven to 350 degrees F.  Butter a 9 x 13" casserole dish; set aside.

Heat milk in a medium saucepan.  In a high sided skillet melt 6 tablespoons butter over medium heat.  When butter is melted, add flour.  Cook stirring for 1 minute.  Slowly pour hot milk into roux while whisking.  Continue cooking over medium heat, whisking constantly until the mixture bubbles and becomes thick.  This can take quite a while.  When the bechamel has thickened, remove from the heat and stir in salt, pepper, nutmeg, cayenne, Gruyere cheese and Parmesan cheese.  Set cheese sauce aside.

In a saute pan over medium heat, melt 1 tablespoon butter and add sliced shallots.  Stir occasionally cooking until softened and caramelized but not browned.  Add chopped artichoke hearts and spinach and saute until spinach is tender and slightly wilted, 2 minutes.  Remove from heat and set aside.

Cook elbow macaroni according to package minus 2 minutes, until cooked but slightly under done.  Drain and rinse with cold water.

Mix cooked pasta and vegetables with sauce and pour into prepared casserole dish.  Sprinkle all of the feta cheese over the top of the mixture.  Melt remaining tablespoon of butter and toss with bread crumbs, sprinkle over the top.  Bake until browned on top, about 30 minutes.

Serves 12 people

Wednesday, February 1, 2012

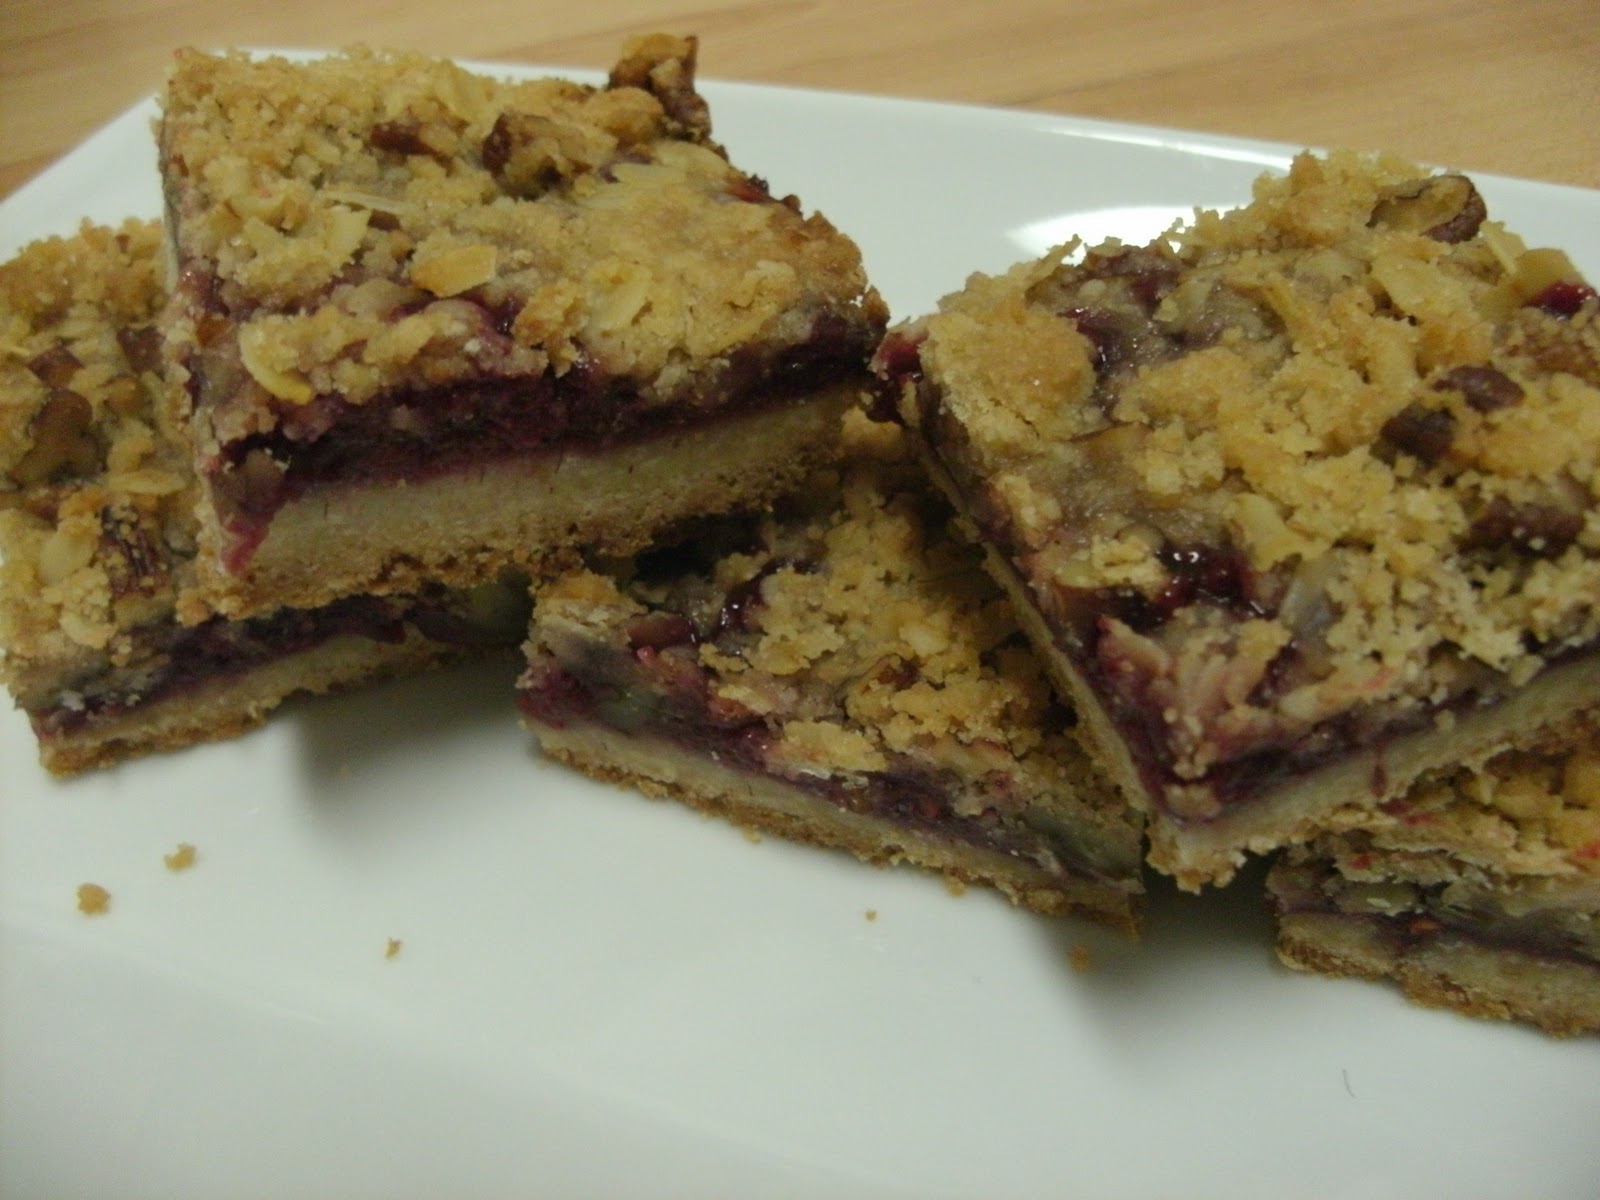
Raspberry Streusel Bars


Ohhhh raspberries...my favorite fruit!  I know it's not summer but I can't wait until summer to have these yummy bars again.  Raspberries may not be in season but they are available all year long if you are willing to pay the price.  You could possibly use frozen raspberries or omit the fresh raspberries all together and add more preserves.  I personally wouldn't change a thing, these bars are perfect!! 

I came across this recipe on my favorite food blog, Brown Eyed Baker, this past spring and I've been hooked ever since.  Michelle (the brown eyed baker) has flawless recipes and I am a devoted follower.  You will see many of her recipes on my site as I continue to build my blog.  I made no changes to the recipe whatsoever, it is perfect as is!  I love the buttery base and the crumbly streusel topping with oats and pecans but my favorite part of these delicious bars is the filling.  Most raspberry bars have a filling of raspberry preserves but this recipe has fresh raspberries crushed in with the preserves.  They are fabulous and addictive!  

Enjoy!  ;)


Raspberry Streusel Bars

2½ cups all-purpose flour
2/3 cup granulated sugar
½ teaspoon salt
1 cup plus 2 tablespoons unsalted butter, divided, cut into ½-inch pieces and at cool room temperature
¼ cup light brown sugar
½ cup old-fashioned rolled oats
½ cup (2 ounces) pecans, chopped fine
¾ cup (8½ ounces) raspberry preserves
¾ cup (3½ ounces) fresh raspberries
1 tablespoon lemon juice

Preheat the oven to 375 degrees F. Line a 9×13-inch pan with foil so it hands over the edges. Spray the foil-lined pan with nonstick cooking spray.

In the bowl of a stand mixer fitted with a paddle attachment, mix the flour, granulated sugar and salt at low speed to combine, about 5 seconds. With the machine on low, add 1 cup of the butter, 1 piece at a time, then continue mixing on low until the mixture resembles damp sand, 1 to 1½ minutes. (If using a food processor, process the flour, granulated sugar, and salt until combined, about 5 seconds. Scatter the 1 cup of butter pieces over the flour mixture and pulse until the mixture resembles damp sand, about twenty 1-second pulses.)

Measure 1¼ cups flour mixture into a medium bowl and set aside; distribute the remaining flour mixture evenly in the bottom of the prepared baking pan. Using your fingers or the bottom of a measuring cup, firmly press the mixture into an even layer to form the bottom crust. Bake until the edges begin to brown, 14 to 18 minutes.

While the crust is baking, add brown sugar, oats, and nuts to the reserved flour mixture; toss to combine. Work in the remaining 2 tablespoons of butter by rubbing the mixture between your fingers until the butter is fully incorporated. Pinch the mixture with fingers to create hazelnut-sized clumps; set streusel aside.

Combine preserves, raspberries, and lemon juice in a small bowl; mash with a fork until combined but some berry pieces remain.

Spread the filling evenly over the hot crust; sprinkle the streusel topping evenly over the filling (do not press streusel into filling). Return the pan to the oven and bake until the topping is a deep golden brown and the filling is bubbling, 22 to 25 minutes. Cool to room temperature on a wire rack, 1 to 2 hours; remove from the baking pan by lifting the foil extensions. Cut into squares and serve. The bars can be stored in an airtight container at room temperature.

Recipe adapted from browneyedbaker.com